
Have you ever imagined gliding effortlessly across the water in your kayak, focusing more on your surroundings than paddling? Attaching a trolling motor to your kayak can transform this dream into a reality.
Imagine the thrill of exploring further distances, fishing in remote spots, or simply enjoying a leisurely ride without breaking a sweat. In this guide, you’ll discover how easy it is to enhance your kayaking experience with a trolling motor. We’ll walk you through the steps, ensuring you feel confident and excited about this upgrade.
Whether you’re a seasoned kayaker or a beginner, this information will empower you to make the most of your time on the water. Dive in to learn how to attach a trolling motor to your kayak and unlock a new level of adventure.
Choosing The Right Trolling Motor
Choosing the right trolling motor is crucial for a successful kayaking experience. The right motor can enhance your adventure by providing smooth and efficient navigation. But how do you decide which one suits your kayak best?
Types Of Trolling Motors
Trolling motors come in two main types: transom-mountedand bow-mounted. Transom-mounted motors attach to the stern of your kayak, making them easier to install and ideal for smaller kayaks. Bow-mounted motors, on the other hand, are more common in larger kayaks and offer better maneuverability.
Reflect on your kayaking style. If you prefer leisurely paddling in calm waters, a transom-mounted motor might suffice. However, if you enjoy fishing or need precise control in windy conditions, consider investing in a bow-mounted motor.
Motor Power And Size Considerations
Motor power, measured in pounds of thrust, directly impacts your kayak’s speed and handling. A general rule is that a motor with 30 to 40 pounds of thrust is adequate for most kayaks. However, if you’re dealing with strong currents or carrying extra gear, you might want a bit more power.
Size matters, too. Ensure the motor’s shaft length is appropriate for your kayak to avoid the propeller being too deep or too shallow in the water. Having once chosen a motor that was too powerful for my lightweight kayak, I learned that balancing power and size is key to a seamless kayaking experience.
Have you ever considered how different motors might affect your kayaking trips? Making an informed choice not only enhances performance but also ensures safety and satisfaction on the water.

Credit: www.youtube.com
Preparing Your Kayak
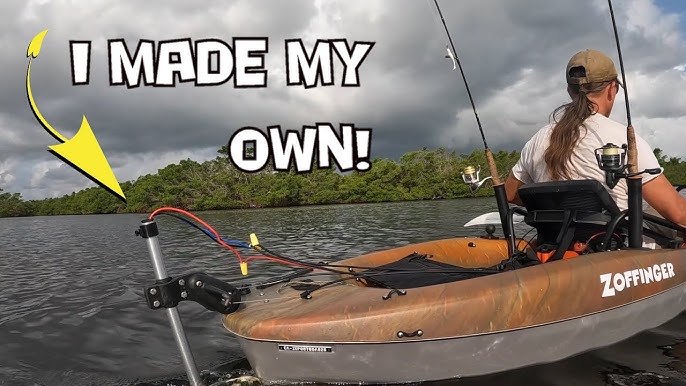
Attaching a trolling motor to a kayak involves selecting the right motor mount. Secure it firmly to avoid instability. Connect the motor, ensuring all wires are properly sealed to prevent water damage.
Preparing your kayak for a trolling motor is an exciting step. This process will enhance your kayaking adventures with effortless navigation. A little preparation goes a long way in ensuring a smooth installation. Before attaching the motor, focus on evaluating your kayak’s compatibility and gathering the necessary tools.Assessing Kayak Compatibility
Not all kayaks are suitable for trolling motors. Check if your kayak’s design supports a motor mount. Look for a flat, stable surface at the stern or side. Ensure your kayak can handle the extra weight of the motor and battery. Consider the kayak’s material for securing the motor firmly. Fiberglass and hard plastic kayaks work best.Essential Tools And Materials
Gathering the right tools simplifies the installation process. Here’s a list of essential items:- Drill with drill bits
- Wrench set
- Marine-grade screws and bolts
- Waterproof sealant
- Measuring tape
- Marker or pencil
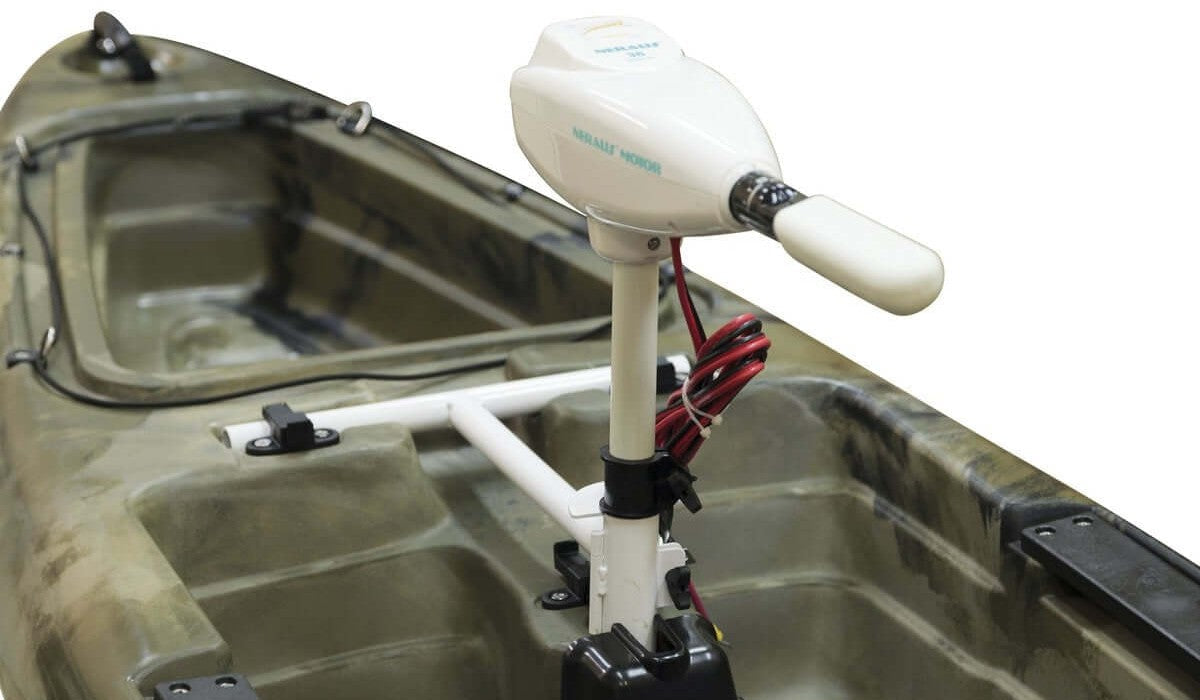
Mounting Options For Trolling Motors
Attaching a trolling motor to a kayak can enhance your fishing experience. Consider using a side mount for easy access and stability. Opt for a transom mount if you prefer a straightforward installation. Each option offers unique benefits, ensuring a seamless and enjoyable journey on the water.
Mounting Options for Trolling Motors Attaching a trolling motor to your kayak can enhance your fishing experience. Choosing the right mounting option is crucial. Different mounting styles offer unique benefits. Understanding these can help you select the best fit for your needs.Transom Mounts
Transom mounts are quite popular. They attach to the back of the kayak. This position provides stability and balance. It suits those who prefer a straightforward setup. Installation involves securing the motor to the stern. This option is user-friendly and easy to manage. It’s ideal for beginners.Bow Mounts
Bow mounts are for those seeking precision. They attach to the front of the kayak. This location offers better maneuverability. It allows for easier steering and control. Installation might be more complex. It requires securing the motor to the bow. Bow mounts are perfect for advanced users. They enhance navigation and control.Side Mounts
Side mounts offer a versatile option. They can attach to either side of the kayak. This provides flexibility in positioning. Side mounts suit those who need easy access. They allow for quick adjustments while on water. Installation involves clamping the motor to the side. This option balances accessibility and stability. It’s great for those who want flexibility.Installing The Motor Mount
Secure the motor mount by aligning it with the kayak’s body. Ensure it’s tightly fastened for stability. Attach the trolling motor to the mount, making sure all bolts are secure.
Installing the motor mount on your kayak is a pivotal step in preparing for an enhanced paddling experience. A well-installed mount ensures the motor stays secure, providing you with peace of mind while navigating waters. Let’s look at how to position and secure the motor mount effectively.Positioning The Mount
Finding the right spot for your motor mount is crucial. Ideally, place it at the stern of your kayak for optimal balance and steering control. Ensure the mount is level to avoid any tilt that might affect your kayak’s performance. Consider the kayak’s weight distribution. Adding a trolling motor changes how your kayak maneuvers, so think about how it affects your paddling and stability. You might want to practice on land first, using weights to simulate the motor. Don’t forget about accessibility. The mount should be easy to reach from your sitting position, ensuring you can quickly make adjustments if needed. Have you thought about how comfortable you’ll be reaching for controls while seated?Securing The Mount
Once you’ve positioned the mount, it’s time to secure it firmly. Use sturdy bolts and nuts, preferably stainless steel, to prevent rusting. Tighten them enough to hold the mount securely, but avoid over-tightening, which might damage your kayak. Consider using a backing plate or washers. These can distribute the load and reduce the risk of cracks or deformations in the kayak material. Do you have the right tools ready for this task? Lastly, give the mount a gentle shake. If there’s any movement, reassess and tighten the connections. A stable mount not only supports the motor but also ensures your safety on the water. How confident are you in the mount’s stability before setting off?Attaching The Trolling Motor
Secure the trolling motor mount onto the kayak. Ensure it fits tightly without wobbling. Attach the motor and connect the power source, checking all connections for safety.
Attaching a trolling motor to a kayak adds power to your paddling adventures. This setup lets you explore waters with ease. It enhances your kayak’s capabilities, offering a new dimension to your fishing trips or leisure paddles. Understanding how to properly attach the trolling motor is crucial for safety and performance. Let’s dive into the details of this important task.Aligning The Motor
Proper alignment ensures smooth operation and prevents unwanted drag. Place the motor at the kayak’s stern, ensuring it’s centered. Check the motor’s shaft is parallel to the kayak’s body. This alignment minimizes resistance and enhances maneuverability. Use a level to verify the motor’s vertical position. A well-aligned motor optimizes your kayak’s speed and efficiency.Fastening Techniques
Securely fastening the motor is key for stability. Use mounting brackets designed for kayaks. These provide a sturdy base for the motor. Ensure the brackets are tightly fastened to prevent wobbling. Use stainless steel bolts to resist corrosion. Tighten them with a wrench for a firm hold. Double-check all connections for safety. A well-fastened motor stays steady during your ride.
Credit: www.facebook.com
Electrical Connections
Secure the trolling motor mount firmly to the kayak to ensure stability. Connect the motor’s power cables to the battery, making sure the connections are tight and waterproof. Test the motor to verify proper functionality and smooth operation.
Attaching a trolling motor to a kayak can make your fishing adventures smoother. Proper electrical connections ensure a reliable and safe setup. This section covers the essentials for setting up the electrical components correctly.Battery Selection
Choosing the right battery is crucial. A deep-cycle marine battery is ideal. It provides sustained power without frequent recharging. Consider the weight and size. Your kayak should handle the battery’s weight without tipping. Look for batteries with a high amp-hour rating. This ensures longer usage time on the water.Wiring And Safety Tips
Wiring the trolling motor correctly is important. Use marine-grade wires. They are resistant to water and corrosion. Properly insulated wires prevent short circuits. Secure all connections tightly. Loose connections can lead to power loss. Install a waterproof fuse. It protects the motor from electrical surges. Safety is key. Wear gloves when handling wires. Ensure all electrical components are dry. A wet setup can be dangerous. Keep the battery away from direct sunlight. Heat can affect its performance. Regularly check connections for wear and tear. Replace any damaged wires immediately.Testing And Adjustments
Testing and making adjustments to your kayak’s trolling motor is crucial. This ensures smooth operation and enhances your kayaking experience. Proper adjustments lead to better control and stability. Below, we delve into the steps for testing and making adjustments.
Initial Test Run
Begin by launching your kayak in calm waters. Ensure your trolling motor is securely attached. Power on the motor at a low speed. Observe how the kayak moves and responds. Listen for unusual sounds from the motor. These might indicate loose parts or misalignments. Check if the motor propels the kayak straight. Any deviation might require adjustments.
Making Necessary Adjustments
If the kayak veers to one side, adjust the motor’s alignment. Loosen the clamps slightly, then reposition the motor. Tighten the clamps securely after aligning. Test again to see if the issue persists. Adjust the motor’s depth in water if needed. It should neither be too deep nor too shallow. This ensures optimal propulsion and efficiency.
Inspect the motor’s connections for tightness. Tighten any loose bolts or screws. Ensure the battery connections are secure. Loose connections can affect the motor’s performance. Regularly check these during your outings for consistent performance.
Credit: brooklynkayakcompany.com
Maintenance Tips
Attaching a trolling motor to a kayak requires careful alignment and secure mounting. Ensure the motor is centered and balanced to avoid tipping. Regularly check connections and battery life for safe and efficient kayaking experiences.
Maintaining your trolling motor ensures a smooth kayaking experience. Regular upkeep can extend the motor’s life and keep it running efficiently. Here are some essential maintenance tips for your kayak’s trolling motor.Routine Checks
Inspect the motor and its components regularly. Look for any loose bolts or screws. Tighten them to prevent parts from falling off. Check the battery connections. Ensure they are secure and free of corrosion. Clean any debris from the propeller. This prevents damage and ensures optimal performance. Test the motor in a safe area before each trip. Make sure it runs smoothly and responds well to controls.Troubleshooting Common Issues
Sometimes, your motor may not start. Check the battery charge first. Ensure it is fully charged and connected correctly. If the motor is noisy, inspect the propeller. Remove any weeds or fishing lines. For erratic speeds, examine the throttle settings. Ensure they are adjusted properly. If the motor overheats, give it a rest. Let it cool down before using it again.Frequently Asked Questions
Can You Mount A Trolling Motor To A Kayak?
Yes, you can mount a trolling motor to a kayak. Use a motor mount or bracket for proper installation. Ensure compatibility with your kayak and motor model. Check weight capacity and balance for safety. A trolling motor enhances speed and maneuverability, ideal for fishing or long trips.
Where Is The Best Place To Mount A Trolling Motor On A Kayak?
Mount the trolling motor on the kayak’s stern or bow. The stern offers better stability and control. Bow placement enhances maneuverability. Consider your kayak’s design and personal preference for optimal performance.
Is It Worth Putting A Trolling Motor On A Kayak?
Yes, adding a trolling motor to a kayak enhances speed and maneuverability. It makes fishing and long trips easier. Consider weight, battery space, and local regulations. A motorized kayak offers convenience and efficiency, especially in large water bodies. Evaluate your needs and budget before installation.
Is It Legal To Put A Trolling Motor On A Kayak?
Yes, it’s legal to put a trolling motor on a kayak. Check local regulations for specific requirements. Always ensure your kayak is registered if needed. Follow safety guidelines and wear a life jacket.
Conclusion
Attaching a trolling motor to a kayak is simple and rewarding. Follow the steps carefully for a smooth setup. A well-mounted motor can enhance your kayaking experience. Enjoy longer trips and explore new waters. Remember to check your kayak’s weight capacity.
Secure all parts tightly to avoid accidents. Practice using the motor in calm waters first. This ensures safety and boosts your confidence. With these tips, you can have a successful installation. Now, it’s time to enjoy new adventures on the water.
Happy kayaking!


