
Picture this: you’re gliding over serene waters, your kayak slicing through the surface like a hot knife through butter. The breeze is gentle, the scenery breathtaking, and everything seems perfect—until you notice a small, unwelcome trickle of water seeping into your kayak.
Suddenly, your peaceful adventure is at risk of turning into a soggy misadventure. But don’t worry; you’re about to discover how to fix that pesky hole and get back to enjoying your time on the water. By the time you finish reading, you’ll have the confidence and know-how to tackle any hole in your kayak, ensuring your adventures remain smooth and dry.
Ready to turn that leak into a distant memory? Let’s dive in!
Assessing The Damage
Evaluating the kayak’s condition is crucial before repair. Inspect the hole size and location for effective patching. Determine the material type to select proper repair tools.
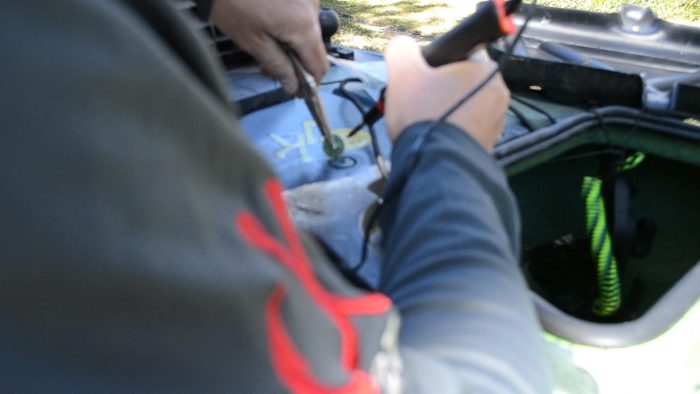
Assessing the damage to your kayak is the first step in repair. Determining the extent helps plan the fix effectively. Begin by closely inspecting the affected area.Identifying The Type Of Hole
Understanding the hole type is crucial. Is it a crack, puncture, or abrasion? Each type requires a different approach. Cracks often appear as lines on the surface. Punctures are usually circular and can penetrate deeply. Abrasions look like worn spots and might be shallow.Evaluating Severity
Severity varies based on the hole’s size and location. Small holes might seem harmless but can lead to leaks. Large holes are visible and demand immediate attention. Check if the hole affects structural integrity. Areas near seams or joints need careful assessment.Gathering Essential Tools
Gather essential tools for kayak repair, including a repair kit, sandpaper, and a heat gun. Proper preparation ensures a smooth and effective fixing process.
Gathering the right tools ensures a smooth kayak repair. You need specific items to fix a hole effectively. This guide will help you gather everything necessary. Let’s begin with the essential materials and safety gear.List Of Required Materials
Ensure you have all the materials before starting. Missing something can delay your repair process. Here’s a list of what you’ll need:- Marine-grade epoxy resin
- Fiberglass cloth
- Sandpaper (various grits)
- Acetone for cleaning
- Mixing containers and sticks
- Utility knife
Safety Gear
Safety is important during any repair process. Wearing the right gear protects you from harm. Here’s what you should wear:- Protective gloves
- Safety goggles
- Dust mask
- Old clothes or a protective apron
Preparing The Kayak
Begin by cleaning the area around the hole thoroughly. Sand the edges to ensure a smooth surface for repair. Apply a patch or epoxy resin over the hole, following manufacturer’s instructions for best results.
Preparing the kayak is crucial before repairing any holes. A clean and dry surface ensures the patch adheres well. It also helps you inspect the area thoroughly. Let’s dive into the steps for getting your kayak ready.Cleaning The Area
Start by washing the damaged area. Use mild soap and water. Scrub gently with a soft brush. This removes dirt and grime. Rinse thoroughly to wash away soap residue. Check for any remaining debris. Cleanliness is key for a strong repair bond.Drying The Surface
After cleaning, dry the area completely. Use a clean cloth or towel. Pat the surface until dry. Allow the kayak to air dry for extra assurance. Moisture can weaken the repair. Ensure there is no dampness left. A dry kayak is ready for the next repair step.
Credit: hub.jacksonkayak.com
Repair Techniques For Plastic Kayaks
Repairing a hole in your plastic kayak can seem daunting, but with the right techniques, you can restore your vessel to its former glory. Whether you’re a seasoned kayaker or a beginner, understanding the repair methods available to you can save time and money. Let’s dive into some effective repair techniques for plastic kayaks.
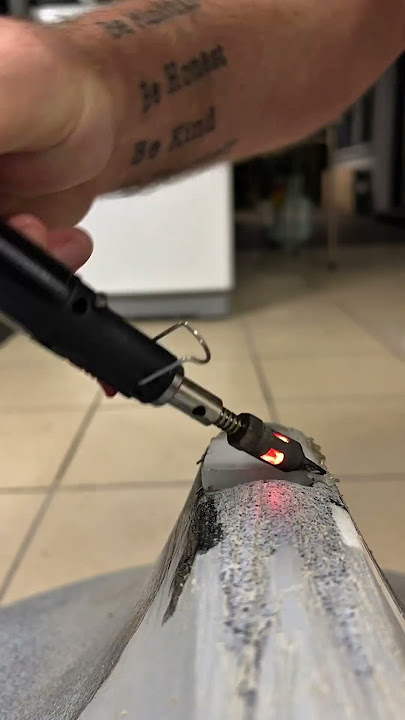
Plastic Welding Method
Plastic welding is a highly effective technique for repairing larger holes or cracks in your kayak. It involves melting plastic rods to fill and seal the damaged area, creating a strong bond.
- Start by cleaning the area around the hole thoroughly. Remove any dirt, debris, or loose pieces of plastic.
- Use a plastic welding kit, which typically includes a heat gun and plastic rods. Choose a rod material that matches your kayak’s plastic for best results.
- Heat the area gently with the heat gun, then slowly feed the plastic rod into the hole, melting it as you go. Work evenly to ensure a smooth finish.
- Once the hole is filled and the plastic has cooled, sand the area lightly to smooth out any rough edges.
Plastic welding provides a durable repair, but requires careful handling of heat tools. Are you comfortable using a heat gun, or would you prefer a simpler method?
Adhesive Patch Application
For smaller holes or quick fixes, adhesive patches are a convenient option. They provide a waterproof seal without the need for heat tools.
- Clean the damaged area thoroughly, ensuring no residue remains. A clean surface is crucial for the patch to adhere properly.
- Cut the adhesive patch to size, allowing for a generous overlap around the hole.
- Peel off the backing and press the patch firmly onto the kayak, smoothing out any air bubbles or wrinkles.
- Allow the adhesive to cure as per manufacturer instructions before using your kayak.
Adhesive patches are easy to apply and ideal for minor repairs. Do you often find yourself short on time, needing a quick fix before hitting the water?
Repair Techniques For Fiberglass Kayaks
Repairing a hole in a fiberglass kayak can seem challenging. But with the right techniques, it becomes manageable. Fiberglass kayaks require specific repair methods to ensure durability and performance. This section explores effective repair techniques for fiberglass kayaks.
Fiberglass Patch Process
Begin by cleaning the damaged area with soap and water. Sand the area around the hole to create a rough surface. This helps the patch adhere better. Cut a piece of fiberglass cloth larger than the hole. Lay the cloth over the hole, ensuring it covers the entire area. Mix the resin and hardener as per the instructions. Apply the mixture over the cloth, soaking it completely. Allow the patch to dry for the recommended time. Once dry, sand the patch smooth to match the kayak’s surface.
Epoxy Resin Application
Choose an epoxy resin suitable for fiberglass repairs. Mix the resin and hardener in equal parts. Stir thoroughly to combine them well. Apply the mixture to the damaged area using a brush. Ensure even coverage over the hole and surrounding area. Allow the epoxy to cure as per the instructions. Once cured, sand the area gently to ensure a smooth finish. Apply a final coat of resin for added strength. Let it dry completely before using the kayak again.
Credit: www.youtube.com
Finishing Touches
You’ve patched up that pesky hole in your kayak and you’re almost ready to hit the waters again. But before you do, it’s crucial to focus on the finishing touches to ensure your repair is durable and water-tight. These final steps can make all the difference between a quick fix and a lasting solution.
Sanding And Smoothing
After applying the patch, grab some sandpaper to smooth out the repaired area. A smooth surface minimizes water resistance and enhances the overall appearance of your kayak.
Start with coarse sandpaper to remove any rough edges or excess material. Gradually shift to finer grit to achieve a polished finish.
Remember, it’s not just about aesthetics. A smooth surface helps the sealant adhere better, providing a stronger bond.
Applying Sealant
Once the surface is smooth, apply a waterproof sealant to ensure the patch stays watertight. Choose a sealant specifically designed for kayaks or outdoor watercraft.
Apply a generous amount over the patched area using a brush or applicator. Be sure to cover all edges and seams for maximum protection.
Allow the sealant to dry thoroughly before testing the kayak in water. This step is crucial for preventing leaks and maintaining the integrity of your repair.
Have you ever gone through all the steps, only to realize you forgot the sealant? It’s an easy oversight, but one that’s simple to avoid with a checklist.
Testing The Repair
Testing the Repair Check the patched area for leaks by gently pressing on it. Water should not seep through. Inspect thoroughly to ensure the kayak is safe and ready for use.
Repairing a hole in your kayak can feel like a victory, but how can you be sure it holds up during your next adventure? Testing the repair is crucial to ensure your kayak is ready to tackle the waters again. It’s not just about fixing a hole; it’s about regaining confidence in your kayak’s performance. Here’s how you can make sure your repair job is solid and your kayak is water-ready.Waterproofing Check
Start by conducting a simple waterproofing test. Fill your kayak with a small amount of water in the area around the repaired hole. Check for any signs of leaks. If water seeps through, the repair may not be fully sealed. Use a flashlight to inspect the area, as even tiny droplets can indicate a problem. Consider this: would you trust a leaky kayak on open water? If you spot any issues, don’t hesitate to apply additional sealant.Performance Assessment
Once you’re satisfied with the waterproofing, it’s time to assess the performance. Take your kayak for a test paddle in calm waters. Pay attention to how it handles and maneuvers. Is there any unexpected wobbling or imbalance? Bring along a friend to observe from a distance, as they might notice something you overlook. Is your kayak gliding smoothly, or is something off? A successful repair should feel seamless, allowing you to enjoy your time on the water without concerns. Remember, a solid repair isn’t just about fixing a hole; it’s about restoring your kayak’s performance and your peace of mind.
Credit: www.youtube.com
Preventive Maintenance Tips
Repairing a hole in a kayak requires simple steps to ensure safety on water. Clean the area around the hole thoroughly. Apply a patch or sealant designed for kayak materials to cover the damaged spot efficiently.
Preventive maintenance is your kayak’s first line of defense against wear and tear. By adopting simple habits, you can protect your kayak from developing holes or other damage. These strategies not only extend the lifespan of your kayak but also enhance your safety and experience on the water.Routine Inspections
Taking a few minutes to inspect your kayak before and after each outing can save you a lot of trouble. Look for any scratches, cracks, or signs of wear. Small issues can escalate quickly if ignored. Pay attention to the seams and joints. If you notice unusual flexing or any gaps, it might be time for a closer look. Consider keeping a flashlight handy. It can help illuminate hard-to-see areas, ensuring you don’t miss anything important.Storage Best Practices
How you store your kayak can impact its durability. Keep it away from direct sunlight and extreme temperatures, as these can degrade materials over time. Elevate your kayak off the ground. This prevents moisture buildup and potential damage from critters. Wall mounts or ceiling racks are excellent options. Use a breathable cover. This protects your kayak from dust and UV rays while allowing air circulation to prevent mold or mildew. Have you ever thought about how the environment affects your kayak when it’s not in use? Small changes in storage can make a big difference in its longevity and performance.Frequently Asked Questions
Can You Repair A Hole In A Kayak?
Yes, you can repair a kayak hole using repair kits or marine sealants. Clean the area first. Apply the patch or sealant, ensuring full coverage. Allow it to dry completely before use. Regular maintenance can prevent further damage. Repair ensures safety and prolongs the kayak’s life.
Will Flex Seal Work On A Kayak?
Flex Seal can seal minor leaks on a kayak. It provides a waterproof barrier, ensuring temporary repairs. Ensure the surface is clean before application for best results. Always test on a small area first. For major damages, professional repair is recommended for long-term durability.
How To Repair A Puncture In A Kayak?
Clean and dry the punctured area. Sand the surface lightly. Apply vinyl adhesive. Press a patch over the puncture. Let it cure for 24 hours.
Will Jb Weld Work On A Kayak?
Yes, JB Weld can repair kayak cracks or leaks. Ensure the surface is clean and dry before application. Use the marine version for best results. It’s a temporary fix, so consider professional repair for long-term use. Always follow the instructions on the product for optimal adhesion.
Conclusion
Repairing a kayak hole is simple with the right steps. Start by gathering necessary tools. Clean the area around the hole thoroughly. Use a patch kit or plastic welding to fill the hole. Ensure the patch is smooth and even.
Wait for it to dry completely before testing. Check for leaks in a safe environment, like a shallow pool. With these steps, your kayak will be ready for adventures again. Enjoy the water safely and confidently. Practice these skills, and maintain your kayak regularly for long-lasting use.
Safe paddling!


