
Imagine gliding over tranquil waters in your kayak, the early morning mist rising around you. You’re eager to catch the big one, but without the right tools, it feels like searching for a needle in a haystack.
That’s where a fish finder can change everything. Installing a fish finder on your kayak can transform your fishing experience, making it more exciting and rewarding. You’re about to unlock a world of underwater secrets, allowing you to spot fish like never before.
In this guide, you’ll learn how to install a fish finder on your kayak, ensuring every fishing trip is a success. Dive in and discover how this game-changing device can elevate your adventures on the water.

Credit: www.tiktok.com
Choosing The Right Fish Finder
Choosing the right fish finder for a kayak involves understanding installation basics. Secure it with a mount and ensure the transducer is positioned correctly. Proper installation enhances fishing experience and accuracy.
Choosing the right fish finder for your kayak can be a daunting task. There are many options and features to consider. A good fish finder makes your fishing trips more successful. It helps you locate fish quickly and easily. This guide will help you select the best fish finder for your needs.Types Of Fish Finders
Fish finders come in various types, each with unique benefits. Portable fish finders are great for those who switch between boats. They’re easy to install and remove. Fixed fish finders are more stable and offer better performance. They are mounted on the kayak and require installation. Castable fish finders are small and attach to fishing lines. They are ideal for shore fishing.Features To Consider
When selecting a fish finder, focus on essential features. Screen size and resolution are crucial. A larger, clearer screen helps you see underwater details. Consider the power source, whether battery-operated or rechargeable. GPS capability is useful for tracking your location. Look for a fish finder with a good depth range. This allows you to fish in various water conditions. Transducer quality affects the accuracy of fish detection. Ensure it suits your fishing style and environment.Gathering Necessary Tools
Installing a fish finder on your kayak opens up exciting possibilities. You’ll need to gather the right tools for a smooth installation. Having everything ready ensures you avoid unnecessary delays.
Essential Equipment
First, collect the core equipment for the installation. You’ll need a drill for making holes. A screwdriver will help secure the fish finder. Get marine-grade sealant to prevent leaks. A measuring tape is essential for precise placement. Make sure to have zip ties for cable management. These tools ensure a sturdy setup.
Safety Gear
Safety should always be your priority. Wear protective gloves when handling tools. Eye protection guards against flying debris. Ensure your kayak is stable on dry land. A life jacket is crucial if working near water. These precautions keep you safe during the installation process.
Selecting Mounting Location
Selecting Mounting Location Choose a spot on your kayak that’s easily accessible and won’t interfere with paddling. Consider a flat surface for a secure fit. Ensure the location provides a clear view of the screen while keeping the transducer submerged in water.
Selecting the right mounting location for your fish finder on a kayak is crucial for optimal performance and convenience. It’s not just about finding a spot to attach the device; it’s about ensuring that it provides you with the best possible view and access while you’re on the water. Consider your kayaking habits and preferences as you decide where to place your fish finder.Bow Vs. Stern
Choosing between the bow and stern of your kayak is a significant decision. The bow, or front, offers a clear line of sight and easy access, especially if you prefer to keep an eye on the display while paddling. However, mounting at the stern, or back, might be ideal if you want to keep the deck area clutter-free and are comfortable with less frequent adjustments. Think about how you use your kayak. If you often paddle in tight spots or through brush, a bow-mounted fish finder might be at risk of damage. On the other hand, stern mounting can be more challenging to access quickly but may provide a safer option in rough conditions.Factors To Consider
When selecting the mounting location, several factors should influence your decision:- Visibility:Ensure the screen is easily visible without straining your neck.
- Accessibility:You need to reach the controls effortlessly. Can you adjust settings or mark spots without overextending?
- Balance:Consider how the weight of the fish finder might affect your kayak’s balance. Will it make paddling awkward or affect your speed?
- Environmental Conditions:Will waves or splashes reach the device? Is it protected from direct sunlight?
Installing The Transducer
Installing the Transducer Ensure the kayak is stable and secure the transducer to the hull. Align it properly for accurate readings.
Installing the transducer on your kayak is a crucial step in setting up your fish finder. It’s the component responsible for sending and receiving sonar signals, which then display fish and structures beneath the water. Getting this right can significantly enhance your fishing experience. But where do you start?Transducer Placement Options
When deciding where to place your transducer, consider the kayak’s design and your fishing style. The most common spots are the hull, scupper holes, or a side mount. – Hull Mounting: Installing the transducer inside the hull protects it from external elements. However, ensure the hull material doesn’t interfere with signal transmission. – Scupper Holes: If your kayak has scupper holes, these can be ideal for a transducer, providing direct contact with water for accurate readings. – Side Mount: Using an arm or bracket on the side offers flexibility. You can adjust or remove it easily, but be cautious of potential snags in shallow waters. Choosing the right spot depends on the kayak’s design and the waters you fish in. Have you considered how each option might affect your paddling?Securing The Transducer
Once you’ve chosen the location, securely attaching the transducer ensures stable readings and longevity of the device. – Adhesive: For internal mounting, use marine-grade adhesive. This method is reliable but requires curing time before hitting the water. – Mounting Brackets: These are ideal for scupper or side mounts. They provide a firm hold and are easy to install with basic tools. – Zip Ties and Straps: A quick and adjustable solution, especially useful for temporary setups. Ensure they’re tightly fastened to prevent movement. Consider the impact of movement or turbulence on the transducer’s stability. Have you checked if the securing method aligns with your kayaking adventures? Proper installation ensures accurate readings, enhancing your fishing success.Mounting The Fish Finder
Mounting a fish finder on a kayak involves selecting the right spot for the display and transducer. Secure the display within easy reach, and ensure the transducer is placed for accurate readings. Use waterproof seals to protect the wiring from water.
Mounting the Fish Finder on your kayak is a game-changer for any fishing enthusiast. It’s not just about slapping the device onto your vessel; it’s about ensuring stability and accuracy for optimal fish tracking. As you embark on this journey, consider how a well-mounted fish finder can transform your fishing experience into a more efficient and rewarding adventure.Choosing Mounting Hardware
Selecting the right mounting hardware is crucial. You want something robust enough to withstand waves yet flexible enough for easy adjustments. Many kayakers opt for RAM mounts due to their durability and versatility. These mounts provide a secure hold and allow you to adjust the angle easily, which is perfect for varying conditions. Think about the materials. Plastic mounts are lightweight and resistant to corrosion, ideal for saltwater environments. Metal mounts, although heavier, offer unmatched stability. Consider where you’ll be fishing and choose accordingly.Fixing The Unit
Once you have the hardware, it’s time to fix the unit. Precision is key here. Positioning your fish finder within arm’s reach ensures easy access without obstructing your paddling. Secure the unit tightly. A loose unit can lead to inaccurate readings and potential damage. Make sure all screws are fastened properly, and test the setup by gently shaking the kayak to check for any movement. Don’t forget about the wiring. Ensure all cables are neatly arranged and secured to prevent tangling. A tidy setup not only looks professional but also prolongs the lifespan of your equipment. Have you considered how the placement of your fish finder can affect your fishing efficiency? A well-mounted unit provides clear, accurate readings, enhancing your ability to spot fish and navigate waters effectively.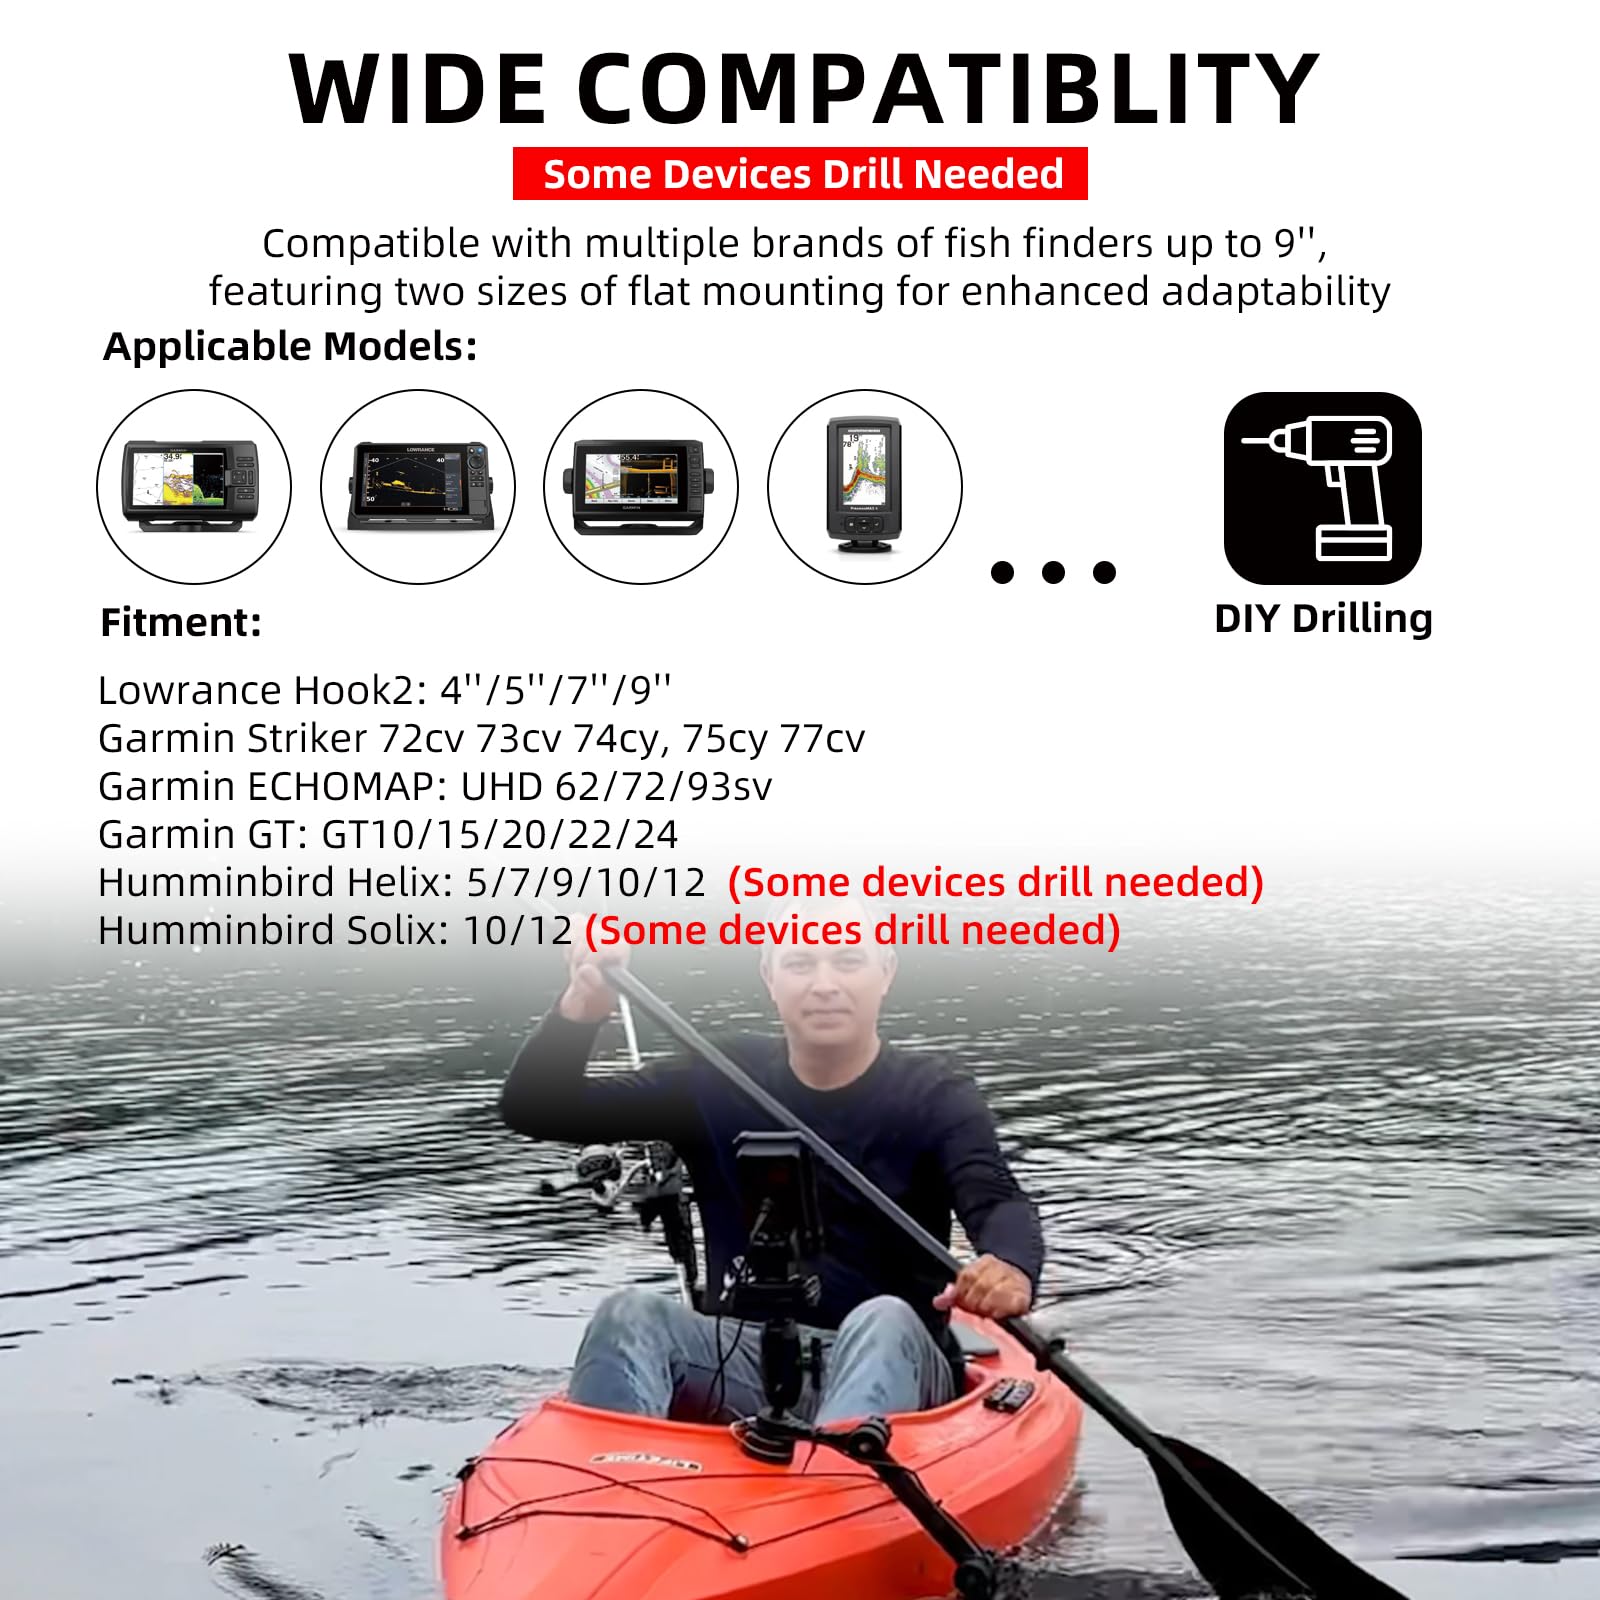
Credit: www.amazon.com
Connecting Power Supply
Connecting the power supply is crucial for a fish finder installation on a kayak. Securely attach wires to the battery terminals. Ensure connections are tight to prevent water damage and maintain consistent power flow.
Connecting a power supply to your fish finder on a kayak is a crucial step that ensures your device functions flawlessly. Proper power connection not only enhances your fish-finding experience but also protects the device from damage. Let’s dive into the essentials of getting the right power supply setup for your fish finder.Battery Options
Choosing the right battery is paramount. Many kayak enthusiasts opt for rechargeable 12V sealed lead acid batteries due to their reliability and compact size. They are easy to charge and fit well in kayak compartments. If weight is a concern, consider lithium batteries. They are lighter and provide longer runtimes, though they come at a higher price. Think about the duration of your fishing trips and the amount of gear you plan to carry. Does your kayak have a designated area for a battery? Assess the space and choose a battery size that fits comfortably, minimizing any chance of it getting wet.Wiring Setup
Once you’ve selected your battery, it’s time to focus on wiring. Using marine-grade wiring ensures durability and resistance to water damage. Keep your wires neat and secure to avoid tangles and potential hazards. An inline fuse is a wise addition to your setup. It protects your fish finder from electrical surges. Place it close to the battery for optimal safety. Consider using waterproof connectors. They seal out moisture and provide a secure link between the battery and fish finder. Have you ever had your gear fail due to water exposure? Waterproof connectors can prevent such mishaps. To keep everything organized, use cable ties to bundle wires neatly. This not only looks cleaner but also prevents accidental disconnections.Testing The Installation
After you’ve securely installed your fish finder on your kayak, it’s time to test the setup. Proper testing ensures that all components are working effectively, and it helps you avoid surprises out on the water. This stage involves a few key checks and adjustments to make sure everything is functioning as expected.
Checking Connections
Start by reviewing all the connections in your installation. Ensure that power cables are properly attached and secure. A loose connection could mean a failed system when you need it most.
Use a multimeter to test the voltage at the fish finder’s power input. You should get a reading that matches the voltage recommended by the manufacturer.
Inspect the transducer cable for any signs of wear or damage. It’s crucial that this cable is intact to send and receive signals effectively.
Are the mounting brackets firmly attached? Give them a gentle shake. If they wobble, tighten them up to prevent movement.
Adjusting Settings
Power up the fish finder and access its settings menu. Adjust the display brightness to suit your typical kayaking conditions. A dim screen can be hard to read in bright sunlight.
Set the sensitivity levels according to the water conditions you usually fish in. Higher sensitivity can pick up more detail but might also lead to clutter from debris or small fish.
Calibrate the depth settings to match your fishing environment. Shallow water requires different settings than deep sea fishing.
Are the alerts and alarms set correctly? Make sure they notify you about the conditions you care about. False alarms can be distracting.
Testing your fish finder installation thoroughly will give you confidence on your next trip. After all, what’s the point of high-tech gear if you’re not sure it works? By following these practical checks and adjustments, you’ll ensure your equipment is ready to help you locate the best fishing spots. Do you have any other testing tips to share?

Credit: www.youtube.com
Maintaining Your Fish Finder
Installing a fish finder on a kayak enhances your fishing experience. Secure the fish finder unit carefully to avoid damage. Ensure all cables are safely tucked away to prevent tripping hazards.
Maintaining your fish finder ensures its longevity and performance. Regular upkeep prevents malfunctions and costly repairs. Proper care enhances your fishing experience.Regular Checks
Inspect your fish finder regularly. Check for loose connections and damaged cables. Ensure the battery is charged and functioning well. Clean the display screen with a soft cloth. Avoid using harsh chemicals. Examine the transducer for any debris or damage.Troubleshooting Common Issues
Is your fish finder not powering on? Check the battery connection first. Ensure it’s properly connected and charged. If the display is unclear, adjust the contrast settings. A weak signal could mean the transducer is misaligned. Reposition it for better performance.Frequently Asked Questions
Where Do You Put The Fish Finder On A Kayak?
Mount the fish finder on the kayak’s deck or side rail for easy access and visibility. Use a compatible mount for stability. Ensure the transducer is submerged for accurate readings. Position near the seat for convenience during fishing trips. Proper placement enhances the fishing experience and device performance.
How To Mount A Fish Finder Transducer Without Drilling?
Use a transducer mounting bracket for a drill-free installation. Attach it to the boat’s transom using marine-grade adhesive or suction cups. Ensure the surface is clean for a secure hold. This method is effective and preserves the boat’s integrity while supporting accurate fish finder readings.
What Is The Best Fishfinder For A Kayak?
The Garmin Striker 4 is a top choice for kayak fishfinders. It offers GPS, CHIRP sonar, and a clear display. Compact and easy to install, it’s perfect for kayaks. Reliable performance and affordable pricing make it popular among anglers.
Where Does The Transducer Go On A Kayak?
Place the transducer on the kayak’s hull bottom, near the centerline, for optimal performance. Ensure it’s not obstructed by any fittings. Secure it firmly to avoid water leaks and vibrations. This location ensures accurate sonar readings, enhancing your kayaking and fishing experience.
Conclusion
Installing a fish finder on your kayak can enhance your fishing trips. It helps locate fish and underwater structures easily. Follow the steps carefully for a successful setup. Secure the mount, connect the power, and test the device. This ensures everything works smoothly on water.
Practice using it before heading out. Adjust settings based on your needs and fishing conditions. With patience, you’ll get the hang of it. Enjoy more productive and enjoyable fishing adventures. Happy fishing!


