
Imagine having the freedom to store your kayak securely without breaking the bank. With your very own DIY kayak rack, this dream can become a reality.
Whether you’re a seasoned paddler or just dipping your toes into the water, building your own kayak rack is not only cost-effective but also incredibly satisfying. You don’t need to be a woodworking expert or have fancy tools. All you need is a little guidance, some basic materials, and a can-do spirit.
Are you ready to dive into a project that saves you money and showcases your handy skills? Keep reading, and discover the step-by-step plans that will transform your storage woes into a streamlined solution. Your kayak deserves a perfect home—let’s build it together!
Benefits Of Diy Kayak Racks
Building your own kayak rack saves money and offers customization to fit your space. It’s a fun project that ensures your kayak is stored safely.
Building your own kayak rack can be an incredibly rewarding project. Not only does it allow you to showcase your craftsmanship, but it also provides you with a customized solution to store your kayak safely. Imagine the satisfaction of designing a rack that fits perfectly in your space and meets your specific needs. Let’s dive into some of the benefits of creating your own kayak rack.Cost-effectiveness
Constructing a kayak rack yourself can save you a substantial amount of money. Commercial racks often come with hefty price tags, whereas DIY racks can be assembled using affordable materials like wood or PVC pipes. Plus, you can tailor the design to fit your budget, selecting materials based on what you can afford.Customization
One of the greatest advantages of a DIY kayak rack is the ability to customize it to your exact specifications. Whether you have a tight garage space or need a rack that holds multiple kayaks, you can design it to fit perfectly. Customization ensures that your kayak is stored safely and efficiently, reducing the risk of damage.Skill Building
Building a kayak rack can be a great way to improve your DIY skills. Each step in the process—from measuring and cutting to assembling and finishing—enhances your abilities. You’ll gain practical experience and confidence, which can be applied to future projects. Plus, there’s nothing like the pride of completing a project with your own two hands.Environmental Impact
DIY projects often have a lower environmental footprint than buying new products. By repurposing materials or choosing sustainable options, you can reduce waste and help the environment. It’s a small step, but a meaningful one, toward more eco-friendly living.Sense Of Accomplishment
Completing a DIY project provides a unique sense of accomplishment. You learn new skills, solve problems, and end up with a finished product that you can be proud of. Sharing this achievement with friends and family can be incredibly gratifying, especially when your creation is admired. Do you have a kayak rack idea that’s been on your mind? Taking the leap into a DIY project might just be the fulfilling challenge you’ve been looking for.Materials Needed
Gather essential materials like wood, screws, and brackets. Use waterproof sealant for durability. Tools like a saw and drill are necessary for assembly.
Building your own kayak rack is a rewarding project. Selecting the right materials ensures durability and safety. Let’s dive into the essentials you need for this DIY adventure.Wood
Wood is the foundation for many kayak racks. Choose sturdy, weather-resistant types like cedar or treated pine. They withstand outdoor conditions well. Cut them to size based on your design. Ensure smooth edges to avoid scratching your kayak.Metal Brackets
Metal brackets provide stability to your rack. They reinforce joints and corners. Opt for galvanized steel to prevent rust. Secure them tightly with screws. This keeps the rack firm even in windy conditions.Screws And Bolts
Screws and bolts are crucial for assembly. Select stainless steel options for longevity. They resist corrosion better than regular types. Use the correct size for each joint. This ensures a snug fit, enhancing rack strength.Sandpaper
Sandpaper smooths rough wood surfaces. It prevents splinters and scratches on your kayak. Choose medium-grit for initial sanding. Finish with fine-grit for a polished look. Regular sanding keeps the wood in top shape.Paint Or Sealant
Paint or sealant protects your rack from elements. Sealant keeps moisture out, preventing wood decay. Paint adds aesthetic appeal and extra protection. Apply evenly for best results. Consider colors that blend with your outdoor space.Measuring Tape
Accurate measurements are key to a sturdy rack. Use a measuring tape for precise cuts. Double-check each measurement. This minimizes errors during assembly. A well-measured rack is safe and functional.Drill
A drill is essential for assembling your rack. It creates holes for screws and bolts. Choose a cordless drill for ease of use. Ensure the drill bit matches screw size. This ensures secure attachments without damaging the wood. These materials are the backbone of your kayak rack project. With them, you can create a reliable storage solution for your kayak.Choosing The Right Location
Selecting the perfect spot for your kayak rack is crucial. Ensure it’s easily accessible and offers protection from harsh weather. This location will help keep your kayak safe and ready for adventure.
Choosing the right location for your DIY kayak rack is crucial. A well-chosen spot ensures easy access and keeps your kayak safe. Consider various factors to find the best place for your rack. Analyze the space, climate, and your own convenience.Assessing Space Availability
First, measure the area where you plan to set up the rack. Ensure there’s enough room for your kayak and any other equipment. The location should not block walkways or other storage spaces. A cluttered area might lead to accidents or damage.Evaluating Weather Conditions
Outdoor racks should be in a sheltered spot. Protect your kayak from rain, sun, and strong winds. Constant exposure can damage its material. If possible, choose a location with a natural or artificial cover.Considering Security Measures
Security is important to prevent theft or vandalism. Place the rack in a well-lit area. Visibility deters potential thieves. Consider installing a lock or alarm system. This adds another layer of protection.Ensuring Easy Accessibility
Choose a location that offers easy access to your kayak. You should be able to load and unload it without hassle. This is important if you use the kayak frequently. A convenient spot saves time and effort.Checking Ground Stability
Ensure the ground is stable and level. Uneven surfaces can cause the rack to tip over. This risks damaging your kayak. Use a level tool to check the ground. Make adjustments if necessary.Proximity To Water Bodies
If possible, locate the rack near a water body. This makes launching and retrieving your kayak easier. It reduces the distance you need to carry it. This proximity is especially useful for frequent paddlers.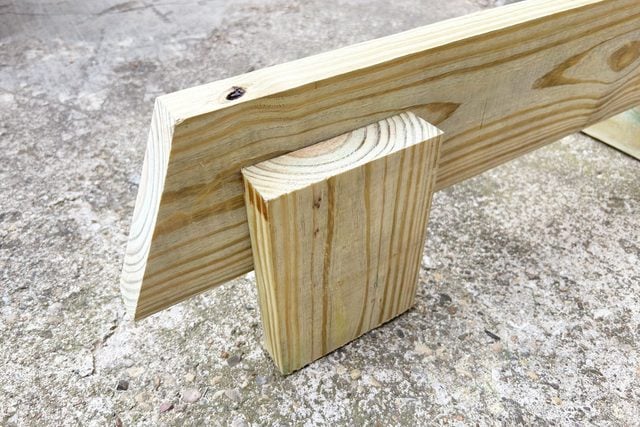
Credit: www.familyhandyman.com
Step-by-step Building Guide
Creating a kayak rack at home is simple with detailed DIY plans. This guide helps you organize your kayaks efficiently. Save space and protect your gear using easy-to-follow instructions.
Embarking on the journey to build your own kayak rack is not only a rewarding DIY project but also a way to tailor a storage solution that perfectly fits your space and needs. This guide will walk you through the essential steps of creating a sturdy and reliable kayak rack. With a bit of patience and careful planning, you’ll have a customized rack that showcases your craftsmanship and safely stores your precious kayaks. Let’s dive into the detailed steps!Preparing The Area
Begin by selecting a suitable location for your kayak rack. This spot should be easily accessible and have enough space to accommodate the number of kayaks you plan to store. Check the ground for stability; a flat and even surface is ideal to ensure your rack stands firm. Clear any debris or obstacles from the area. You might even consider marking the outline of your future rack with chalk or spray paint to visualize the space it will occupy. This step helps avoid surprises once construction starts.Constructing The Base
The base is the foundation of your kayak rack and must be robust. Use pressure-treated wood for durability against outdoor elements. Cut your pieces to the desired length and assemble them into a rectangle using galvanized screws for rust resistance. For added stability, you can create a cross-bracing pattern with additional wood pieces across the base. This feature provides extra support and ensures the structure remains balanced, especially on uneven ground.Building The Frame
Now, it’s time to build the frame. Erect vertical posts at each corner of your base, ensuring they are straight and level. Secure them with brackets for a firm hold. Next, add horizontal beams across the top to form the basic skeleton of your rack. Double-check alignments and make adjustments as needed. This framework will support the weight of your kayaks, so precision is key.Adding Support Features
Enhance your rack with support features like padded arms or slings to cradle your kayaks gently. These additions prevent scratches and keep your kayaks secure. You can use foam padding or old pool noodles as cushioning material. Consider adding hooks or shelves for accessories like paddles and life jackets. This not only optimizes storage but also keeps your kayaking gear organized and ready for your next adventure. Building a kayak rack may seem daunting at first, but with these structured steps, it can be a straightforward and fulfilling project. Are you ready to start crafting your own kayak storage solution?Tips For Customization
Explore creative ways to personalize your DIY kayak rack. Consider using materials like PVC or wood for a sturdy build. Customize by adding padding for protection, or hooks for gear storage.
Customizing your DIY kayak rack can be an exciting part of the building process. It allows you to tailor the rack to meet your specific needs and preferences. From choosing the right materials to adding unique features, a personalized kayak rack can enhance both functionality and aesthetics.Choose The Right Materials
Selecting the right materials is crucial for durability and performance. Consider using weather-resistant wood or metal to withstand outdoor conditions. If you’re environmentally conscious, recycled materials can be a great option.Adjustable Features
Think about adding adjustable elements for flexibility. An adjustable height or width can accommodate different kayak sizes. This adaptability ensures your rack remains useful even if you upgrade your kayak in the future.Color And Finish
Personalize your rack with a splash of color. Choose paint or stain that complements your outdoor space. A protective finish will not only make it look appealing but also increase its longevity.Incorporate Storage Solutions
Why not add extra storage for paddles and gear? Hooks or shelves can be integrated into the design. This keeps all your kayaking essentials in one convenient location.Consider Mobility
Adding wheels can make your rack mobile, offering flexibility in its location. This is particularly useful if you need to move it around your yard or garage. Ensure the wheels are lockable for stability when stationary.Safety Features
Safety should never be overlooked. Implement soft padding or foam to prevent scratches on your kayak. Secure straps or locks can prevent theft and ensure your kayak stays in place during strong winds.Seek Inspiration
Look for inspiration online or in local kayaking communities. Other DIY enthusiasts may have innovative ideas that you haven’t considered. Sharing your plans with others can also lead to helpful feedback and improvements.Test And Modify
Once your rack is built, test it out and make adjustments as needed. Use your real-world experiences to fine-tune the design. This iterative process ensures your rack is both practical and perfect for your needs. Is there a specific feature you’ve always wanted in a kayak rack? Customization gives you the chance to bring that vision to life. With a little creativity and effort, you can create a kayak rack that stands out and serves you well.
Credit: www.theawesomeorange.com
Cost-effective Alternatives
Building your own kayak rack saves money and offers customization. Choose from simple materials like wood or metal. Enjoy a durable, personalized solution for your kayak storage needs.
When it comes to storing your kayak, finding a cost-effective solution can be a game-changer. Building your own kayak rack is not only budget-friendly but also customizable to fit your specific needs. You don’t need to spend a fortune to ensure your kayak is safe and secure. With a few basic materials, you can create a functional rack that suits your space and style.Using Recycled Materials
Consider utilizing recycled materials to keep costs down. Old pallets, wooden crates, or unused pipes can be repurposed into a sturdy kayak rack. This approach is not only economical but also environmentally friendly. You’d be surprised at how durable these materials can be with a little creativity and effort.Minimalist Wall Racks
Opt for minimalist wall racks if you’re looking to save space and money. All you need are a few strong hooks or brackets, which can be easily installed on your garage or shed wall. This method is perfect for those with limited floor space. Plus, it’s an efficient way to keep your kayak off the ground and ready for your next adventure.Simple Freestanding Designs
Freestanding racks made from basic wood planks and nails can be assembled in a matter of hours. They offer flexibility as you can move them around your yard or garage. The straightforward design means you don’t need advanced carpentry skills, making it accessible to anyone willing to give it a try.Multi-purpose Shelving Units
Invest in multi-purpose shelving units that can accommodate your kayak and other outdoor gear. These units often have adjustable shelves, which are perfect for adapting to your storage needs. This versatile option maximizes your space and keeps your kayaking equipment organized. Are you ready to try one of these cost-effective alternatives? By tapping into your DIY skills, you can create a functional kayak storage solution that doesn’t break the bank.Safety Considerations
Prioritize sturdy materials and secure fastenings to ensure stability. Consider weight distribution to prevent tipping or damage. Regular checks can maintain rack integrity and safety.
Safety is a crucial aspect when crafting your own kayak rack. Ensuring your kayak is securely stored can prevent accidents and damage. Considerations about the material, design, and placement are vital. Proper safety measures ensure peace of mind and protect your investment.Material Choice
Select strong, durable materials. Wood and metal are reliable choices. Ensure they can support the kayak’s weight. Avoid materials that can easily break or wear down. Check for corrosion if using metal. Regular maintenance can extend the lifespan and safety.Design Stability
Design a stable structure. Consider weight distribution and balance. Use braces or supports for added strength. Ensure the rack does not tip over. Testing the rack’s stability before use is essential. Make adjustments if needed.Proper Installation
Install the rack securely. Use sturdy wall anchors for wall-mounted racks. Check the ground stability for freestanding racks. Ensure the rack is level and balanced. Follow the installation instructions carefully. Double-check fastenings and joints.Weather Resistance
Protect your rack from weather elements. Use waterproof materials or coatings. Prevent rust and decay in outdoor settings. Check for weather damage regularly. Ensure the rack remains in top condition.Location Considerations
Choose a safe location for the rack. Avoid busy areas where accidents might occur. Ensure easy access without obstructing pathways. Consider visibility and accessibility for safety. Prevent accidental bumps or falls.Regular Maintenance
Inspect the rack frequently. Check for wear and tear. Tighten loose screws and bolts. Replace damaged parts immediately. Regular maintenance ensures ongoing safety. Keep the rack in optimal condition.Weight Capacity
Know the weight limit of your rack. Ensure it can handle the kayak’s weight. Avoid overloading which could lead to collapse. Check the rack’s specifications for safety. Prioritize weight capacity in design plans.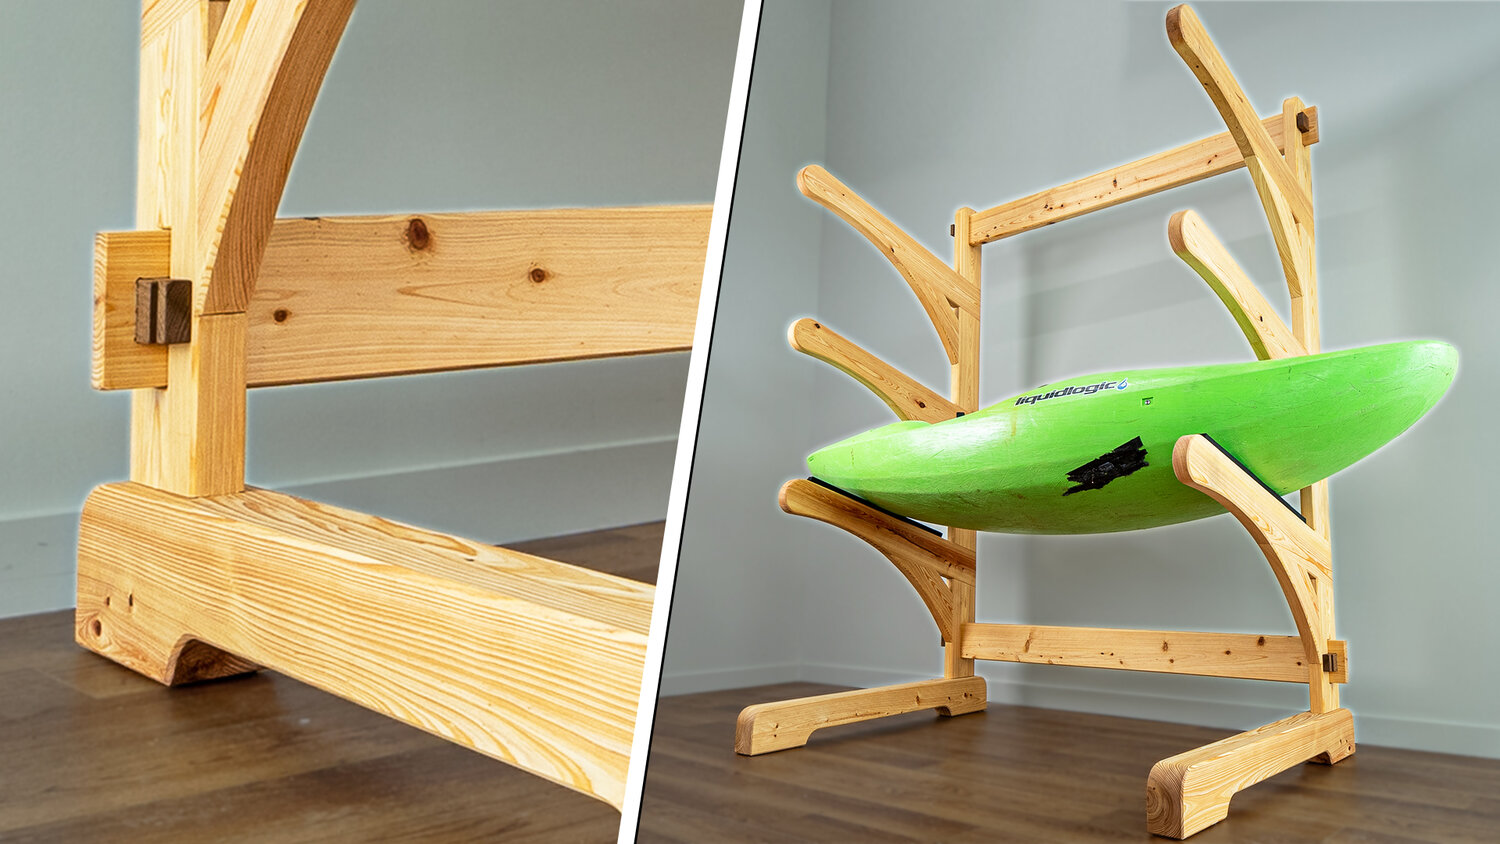
Credit: craftedworkshop.com
Maintenance And Care
Crafting your own kayak rack can be rewarding and practical. Regular checks ensure its durability and safety. Keep joints tight and surfaces free from debris to prolong its life.
When you build your own kayak rack, caring for it is important. Proper maintenance ensures longevity and safety. Regular checks keep your kayak secure and your rack in good condition. Follow simple steps to maintain your DIY kayak rack effectively.Inspect Regularly For Wear And Tear
Examine the rack for any signs of damage. Check for loose screws or bolts. Look for any cracks in the wood or metal parts. Regular inspections help spot issues early. Fix any problems before they become serious.Clean The Rack Periodically
Dust and dirt can accumulate over time. Use a soft cloth to wipe the rack clean. For stubborn grime, use mild soap and water. Avoid harsh chemicals that might harm the material.Protect Against Weather Elements
Outdoor racks face harsh conditions. Apply a protective finish to wooden racks. This helps guard against rain and sun damage. Metal racks might need a rust-resistant coating.Check For Stability
Ensure the rack remains sturdy and balanced. Test the stability by gently shaking it. Adjust any parts that seem loose or wobbly.Lubricate Moving Parts
If your rack has moving parts, lubrication is key. Apply a suitable lubricant to hinges or joints. This prevents rust and ensures smooth movement.Store Properly During Off-season
If not in use, store the rack in a dry place. Disassemble if needed to save space. Cover with a tarp to protect from dust and moisture. Regular maintenance extends the life of your DIY kayak rack. Keep your kayak secure and ready for your next adventure.Frequently Asked Questions
How To Build A Kayak Rack At Home?
Building a kayak rack at home is simple. Start by choosing sturdy materials like wood or metal. Use a design that fits your space and kayak. Ensure the rack is stable and secure. Follow detailed plans for assembly. This DIY project saves money and provides a custom solution.
What Materials Are Best For Kayak Racks?
Wood and metal are popular choices for kayak racks. Wood is cost-effective and easy to work with. Metal offers durability and strength. Choose materials based on budget and space requirements. Ensure they can withstand outdoor elements if the rack is outside.
Are Diy Kayak Racks Cost-effective?
Yes, DIY kayak racks are often cost-effective. You can save money by using recycled materials. Custom designs fit your specific needs. The cost is generally lower than store-bought options. Plus, building your own rack adds a personal touch to your storage solution.
How Long Does It Take To Build?
Building a kayak rack can take a few hours to a weekend. The time depends on complexity and materials. Simple designs are quicker to assemble. Detailed plans help streamline the process. Allocate time for planning, gathering materials, and construction.
Conclusion
Building your own kayak rack is a rewarding project. You save money and gain useful skills. Plus, you create storage that fits your needs perfectly. Materials are easy to find. Instructions are straightforward. With some effort, your kayak finds a safe spot.
It’s a fun task for any DIY enthusiast. Get your tools ready. Plan your design. Start crafting your unique kayak rack today. Enjoy the process and the results. It’s satisfying to see your creation come to life. Safe adventures await with your new kayak rack.