

Imagine walking into your garage or backyard, and instead of stumbling over a kayak every time you need something, you see a neat, organized space where your kayak is safely stored. Sounds like a dream, right?
But this dream can be your reality with a DIY kayak storage rack. You don’t need to be a professional carpenter to build one. With a little guidance and some basic tools, you can create a storage solution that suits your space and style.
Not only will this project save you money, but it will also give you the satisfaction of crafting something useful with your own hands. Ready to transform your space and protect your kayak investment? Dive into this guide to discover how easy and rewarding it is to build your own kayak storage rack.

Credit: www.storageracksolutions.com
Benefits Of Diy Kayak Storage
Building your own kayak storage rack is cost-effective and customizable. It maximizes space and protects your kayak from damage. Enjoy a sense of accomplishment and practicality with this simple DIY project.
Creating your own kayak storage rack can be a rewarding and practical endeavor. Not only does it offer a sense of accomplishment, but it also brings several tangible benefits to the table. Whether you’re a seasoned kayaker or just starting out, understanding the advantages of DIY kayak storage can make all the difference in how you manage your gear.Cost-effective Solution
Building your own kayak storage rack is a budget-friendly option. With a DIY approach, you can use materials you already have or purchase affordable supplies. Compare this to buying a pre-made rack, and you’ll see significant savings. Consider using reclaimed wood or metal pipes. These materials are often inexpensive and can be easily found at your local hardware store. Plus, you’ll have the satisfaction of knowing you built something with your own hands.Space Optimization
A custom-built rack can help you maximize your available space. You can design it to fit perfectly in your garage, backyard, or any storage area. This flexibility allows you to make the most of every square inch. Think about the space you have and how you can use it efficiently. A vertical rack might be ideal for tight spaces, while a horizontal one could work in a more spacious area. The choice is yours, and you can adjust as needed.Customization Options
With a DIY kayak storage rack, customization is at your fingertips. You can tailor the design to suit your specific needs and preferences. Whether it’s the size, shape, or color, you have full control. Add hooks for accessories, create adjustable shelves, or paint it to match your style. The possibilities are endless, and you can update or modify it as your storage needs evolve. Have you ever wanted to personalize your gear storage? With a DIY approach, you can let your creativity shine and build a rack that’s uniquely yours.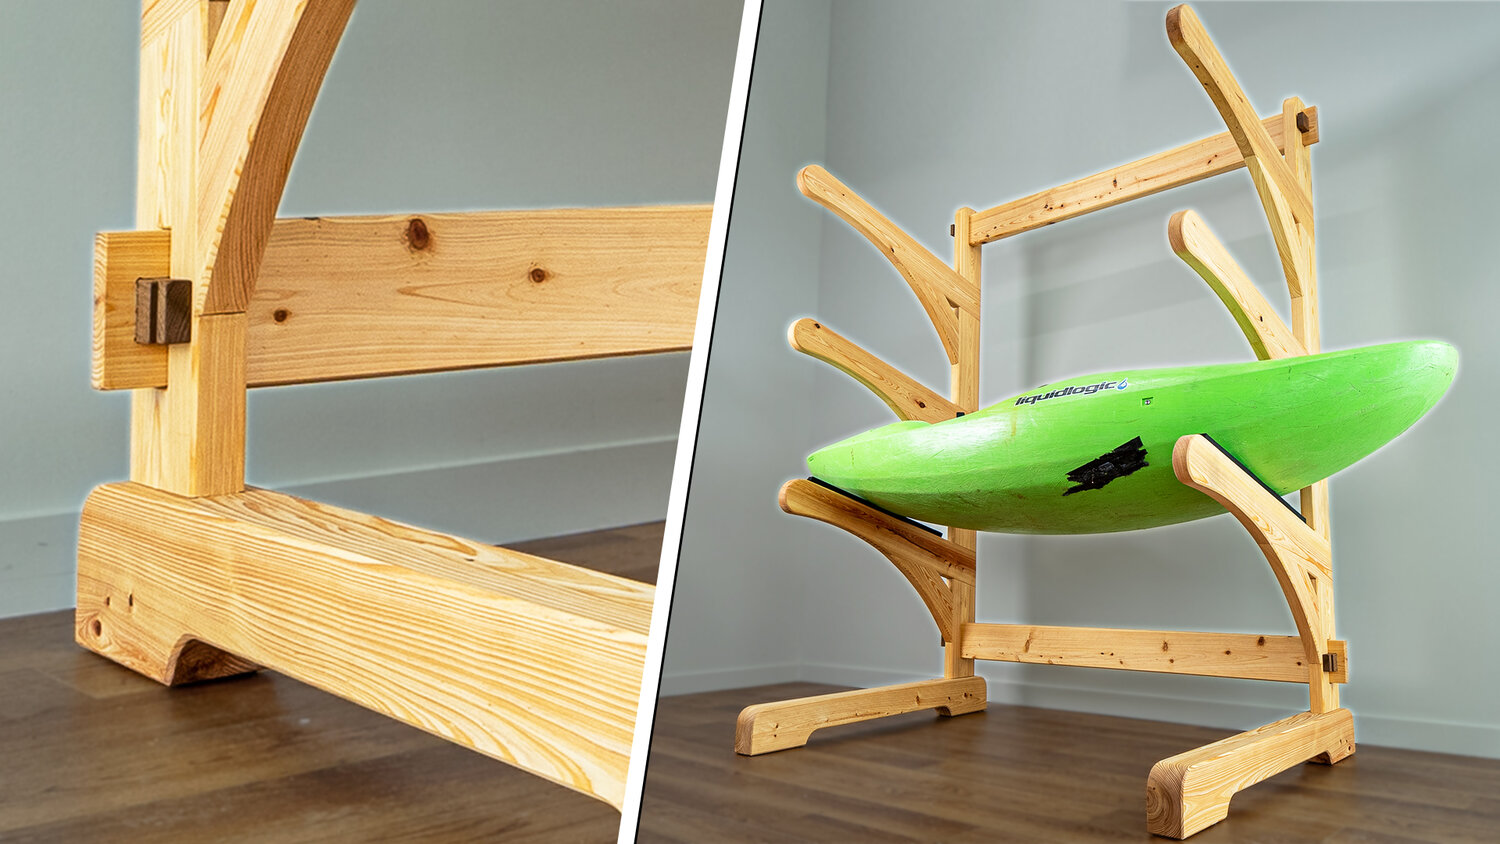
Credit: craftedworkshop.com
Materials Needed
Creating your own kayak storage rack can be both rewarding and practical. This project requires careful selection of materials to ensure durability and functionality. Using the right materials will not only make the rack sturdy but also enhance its appearance. Let’s explore the essential materials needed to build a reliable kayak storage rack.
Wood And Metal
Wood is a popular choice for DIY kayak racks due to its natural look. It is easy to work with and can be cut to any size. Choose sturdy types like cedar or treated pine to prevent rot.
Metal provides strength and longevity. Steel or aluminum are common options. They resist weather elements and offer great support for your kayak.
Tools And Accessories
Having the right tools is crucial for this project. A saw will help cut the wood to the desired length. A drill is needed for creating holes and assembling parts.
Include screws and bolts to secure the pieces together. Sandpaper will smooth out rough edges, ensuring a polished finish. Consider adding padding materials to protect the kayak from scratches.
Planning Your Design
Planning your design for a DIY kayak storage rack is essential. Choose a spot with enough room for your kayak. Consider materials that are sturdy and weather-resistant.
Planning your design is a crucial step in creating a DIY kayak storage rack. A well-thought-out plan ensures the rack meets your needs and fits your space. Start by sketching a rough design. Consider the number of kayaks you need to store. Think about materials you have or want to purchase. Your design should be both functional and aesthetically pleasing.Assessing Available Space
First, evaluate the space where you plan to install the rack. Measure the area to understand the dimensions you can work with. Consider the height, width, and depth of the space. Check for obstacles like windows, doors, or pipes. Make sure the area is easily accessible. Keep in mind, the rack should not block pathways or exits.Choosing The Right Style
Decide on the style of rack that suits your space and needs. Wall-mounted racks save floor space and are great for garages. Freestanding racks can be moved and are ideal for larger areas. Ceiling-mounted racks work well for storing kayaks overhead. Choose a style that complements your home’s design. Consider ease of access when selecting a rack style.Step-by-step Construction
Create a sturdy kayak storage rack with this easy DIY guide. Gather materials like wood and screws. Follow clear steps to assemble a reliable rack, ensuring your kayak is safely stored. Perfect for enthusiasts who want to save space and keep their gear organized.
Embarking on the adventure of building your own kayak storage rack not only saves money but also provides a sense of accomplishment. Imagine the satisfaction of creating something with your own hands that perfectly fits your space. Let’s dive into the step-by-step construction process, breaking down the tasks into manageable pieces.Building The Frame
Start by selecting sturdy materials like treated wood or metal for the frame. Consider the size of your kayak and the space available. Cut the materials to your desired dimensions, making sure they are long enough to comfortably hold your kayak. Use a level to ensure each piece is straight before attaching them. Secure the frame using screws and a drill, ensuring everything is tightly fastened. This will form the backbone of your rack, so make sure it’s solid.Adding Supports
With the frame in place, add supports to hold the kayak securely. Measure the width of your kayak to determine the spacing needed between supports. Attach horizontal beams to the frame at intervals that match your kayak’s width. Consider using padded materials for extra protection against scratches. Test the supports with a small amount of weight to ensure they can bear the kayak. Adjust as necessary for stability.Securing The Rack
Once the rack is assembled, anchor it to the ground or wall for added security. Use heavy-duty brackets or bolts to prevent the rack from tipping over. Check that all connections are tight and secure. This will ensure your kayak stays safe, even in windy conditions. Finally, consider adding some weatherproofing if your rack is outdoors. A coat of sealant can go a long way in preserving your hard work. Isn’t it fascinating how a few simple steps can transform raw materials into a functional piece? Would you try this DIY approach for storing your kayak?Safety Considerations
Creating a Do It Yourself (DIY) kayak storage rack can be a rewarding project that saves space and protects your kayak. However, safety considerations are crucial to ensure your kayak is securely stored and easily accessible. Proper planning and execution can prevent accidents and prolong the life of your kayak. Let’s dive into some key safety aspects you need to keep in mind.
Weight Distribution
One of the most critical factors in designing your kayak storage rack is how the weight is distributed. Kayaks can be heavy, and uneven weight distribution might lead to the rack tipping over or collapsing.
- Ensure the rack is sturdy enough to support the kayak’s weight.
- Use materials like steel or treated wood for added strength.
- Distribute the weight evenly across the rack to avoid stress points.
Consider your kayak’s dimensions and weight; this will help you choose the right design and materials. A well-balanced rack not only prevents accidents but also keeps your kayak in good shape.
Stability And Balance
Stability is another pivotal aspect of your DIY kayak rack. An unstable rack can lead to serious damage to your kayak and pose safety risks to you and others.
- Check the ground or surface where the rack will be placed; it should be level.
- Secure the rack to a wall or floor if possible, for added stability.
- Test the rack by gently rocking it; it should remain firm and unmoving.
Imagine the inconvenience of a kayak falling due to a slight bump or breeze. Stabilizing your rack can prevent such mishaps. Wouldn’t you feel more secure knowing your kayak is safely stored?
By focusing on these safety considerations, you not only create a functional storage solution but also ensure peace of mind. Your DIY kayak rack should be a reflection of thoughtful design and practical use, allowing you to enjoy kayaking without worrying about storage hazards.

Credit: www.youtube.com
Maintenance Tips
Building your own kayak storage rack ensures your equipment is safe and organized. Use durable materials like PVC pipes or wood. Keep the rack indoors to protect kayaks from weather damage. Regularly check for wear and tear to maintain its sturdiness over time.
Maintaining your DIY kayak storage rack ensures longevity and optimal performance. Regular maintenance can save you from costly repairs and replacements down the line. By following some simple tips, you can keep your kayak rack in excellent condition year-round.Regular Inspections
Regular inspections are essential for spotting potential issues early. Check for loose screws or bolts that might need tightening. Inspect the material for signs of wear, such as cracks or splinters. Make it a habit to review the rack after intense weather conditions. Is your rack still sturdy enough to hold your kayak safely?Weatherproofing Techniques
Weatherproofing can significantly extend the lifespan of your rack. Apply a protective sealant to wooden racks to prevent moisture damage. Consider using rust-resistant paint for metal racks to avoid corrosion. In areas with high humidity, a weatherproof cover can protect your rack and kayak from the elements. How are you safeguarding your rack against the unpredictable weather?Creative Storage Ideas
Creating a DIY kayak storage rack can be an enjoyable project, offering you the chance to express your creativity while keeping your gear organized. With some clever ideas, you can maximize your space and maintain easy access to your kayak. Whether you have a small garage or a spacious backyard, these creative storage solutions can be tailored to fit your needs. Imagine transforming your cluttered area into a neat and efficient space that reflects your personality and style.
Vertical Vs Horizontal Storage
Choosing between vertical and horizontal storage for your kayak depends on the available space and your personal preference. Vertical storage can save floor space and is ideal for garages with high ceilings. It allows you to stack multiple kayaks without taking up much room.
Horizontal storage, on the other hand, provides easy access and reduces the risk of damage. It’s perfect for outdoor spaces or garages where you can dedicate a wall to your kayaks. Consider using sturdy wall brackets or racks that securely hold your kayak and prevent any mishaps.
Incorporating Other Gear
Why not make your kayak rack multifunctional by adding space for other gear? Adding hooks for paddles, life vests, and helmets can keep everything organized and accessible. This approach minimizes the clutter and makes it easy to grab what you need for your next adventure.
Think about using shelves or bins for smaller items like waterproof bags or repair kits. This ensures that all your kayaking essentials are in one place, saving you time and effort. Wouldn’t it be satisfying to have all your gear ready at hand, making your preparation smoother?
Frequently Asked Questions
Is It Better To Store A Kayak Vertically Or Horizontally?
Storing a kayak horizontally with proper support is generally better. It prevents warping and maintains the kayak’s shape. Use padded supports or racks to distribute weight evenly. Avoid pressure points to extend the kayak’s lifespan.
What Is The Best Way To Store Your Kayak?
Store your kayak indoors or under a cover to prevent UV damage. Use a rack to keep it off the ground. Ensure it is dry before storage to avoid mold. Avoid hanging by handles to prevent warping. Regularly inspect for damage to maintain its condition.
How Big Of A Storage Unit Do You Need For A Kayak?
Choose a storage unit at least 10×15 feet for a single kayak. This size offers ample room for accessories.
How To Carry A Kayak Without A Roof Rack?
Use foam blocks or inflatable racks to secure the kayak. Strap it tightly with ratchet straps. Ensure it’s centered and balanced. Keep straps away from sharp edges to avoid damage. Drive slowly and check periodically. These methods help transport without a roof rack safely.
Conclusion
Creating a DIY kayak storage rack is achievable and rewarding. It saves space and keeps kayaks safe. You gain hands-on experience. Plus, it can be customized to fit your needs. The cost is lower than buying a ready-made rack. Building it yourself adds personal satisfaction.
Try using simple materials for construction. Your kayaks will be organized and easily accessible. Enjoy more time on the water. Feel confident in your creation. Share your project with friends. Inspire them to build their own. Happy paddling and crafting!


