
Are you staring at a pesky hole in your trusty plastic kayak, wondering how it appeared and more importantly, how you can fix it? You’re not alone.
Many kayak enthusiasts face this problem, and the good news is that you can fix it yourself with just a little guidance. Imagine gliding smoothly on the water again, your kayak as good as new, ready to take you on countless adventures.
But first, let’s tackle that hole. This guide is designed to provide you with clear, step-by-step instructions on how to repair your kayak effectively. No more worrying about water seeping in or your kayak’s performance being compromised. Dive into the detailed solutions we’ve crafted just for you, and reclaim your peace of mind. Your kayak deserves the best care, and you’re just moments away from giving it exactly that. Ready to get started? Let’s seal that hole and get you back on the water.
Assess The Damage
Assess the Damage Look closely at the hole in your plastic kayak. Find any cracks or weak spots. This helps you decide the right fix.
Assessing the damage in your plastic kayak is a crucial step before diving into repair solutions. It helps you understand the extent of the problem and choose the right method to fix it. With the right assessment, your kayak can be back to its adventures in no time.Identify The Size And Location
First, visually inspect the kayak to pinpoint the hole. Is it a tiny puncture or a larger gash? The size will dictate the approach and materials needed for repair. Consider the location as well. A hole on the hull might affect buoyancy more than one on the deck. If it’s near a seam or joint, the repair might require extra care to ensure it holds under pressure. Are there multiple holes? Each one needs attention. Use a flashlight to check inside the kayak for any hidden damage. Sometimes, a small exterior hole hides a larger interior crack. Ensuring you catch all damage early can save you from future surprises.Determine The Type Of Plastic
Not all plastics are equal, especially when it comes to kayaks. Is your kayak made of polyethylene, ABS, or another type? Knowing the material helps you choose the right repair kit and method. Polyethylene is popular for its durability but requires specific techniques and heat for effective repairs. Meanwhile, ABS might allow for easier patching but could need special adhesives. Check your kayak’s manual or manufacturer’s website for details on the plastic type. This knowledge is vital since using the wrong repair materials can worsen the damage. Are you using the right tools for the plastic type? Double-check to avoid mishaps. Understanding these aspects transforms repair from a daunting task to a manageable project. Have you assessed your kayak properly? Doing so sets the stage for a successful fix.
Credit: www.facebook.com
Gather Necessary Tools
Gather necessary tools like a heat gun, sandpaper, and plastic welding rods. Ensure you have protective gloves and a clean workspace. These essentials help make the repair process smoother and more efficient.
Gathering the right tools is crucial for repairing a hole in your plastic kayak. Having the correct items ensures a smooth and efficient repair process. Start by collecting all the necessary tools before beginning your task. This preparation will save you time and prevent unnecessary frustration.Safety Gear
Safety should always come first. Wear protective gloves to shield your hands from sharp tools or hot materials. Safety glasses protect your eyes from flying debris. If using adhesives or chemicals, consider a mask to avoid inhaling fumes. Keep a first aid kit nearby for any minor injuries that may occur.Repair Materials
Gather the repair materials needed for fixing the kayak. A plastic welding kit is essential for sealing the hole. Purchase plastic welding rods that match your kayak’s material. A heat gun will help melt the rods and seal the hole. Sandpaper is necessary for smoothing out the repaired area. For small holes, marine-grade adhesive or sealant works well. Keep a clean cloth handy to wipe any excess material.Prepare The Kayak Surface
Sand the area around the hole to create a smooth surface. This helps the patch adhere better. Clean thoroughly to remove dust and debris.
Preparing the surface of your kayak is crucial before fixing any holes. A clean and smooth surface ensures strong repair bonding. Follow these steps to get your kayak ready for repair.Clean The Area
Start by washing the damaged area with warm, soapy water. This removes dirt and grime that might affect the repair. Rinse thoroughly to ensure no soap residue remains. A clean surface is essential for a strong repair bond.Sand The Edges
Use fine-grit sandpaper to sand around the hole. Sanding creates a rough surface for better adhesion. Be gentle to avoid damaging the surrounding area. Wipe away any dust with a clean cloth. This step ensures the patch sticks firmly.
Credit: hub.jacksonkayak.com
Choose Repair Method
Assess the damage size and location on your kayak. Use plastic welding for larger holes, ensuring a solid bond. For smaller punctures, marine epoxy offers a quick and durable solution.
Choosing the right repair method for fixing a hole in your plastic kayak can make all the difference. The technique you select will depend on the size and location of the hole, as well as your own comfort and skill level with DIY repairs. It’s essential to weigh your options carefully, as each method has its own benefits and challenges.Plastic Welding
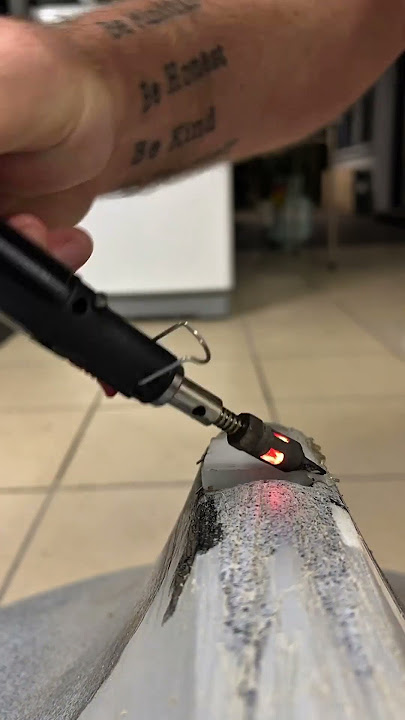
Plastic welding is a popular choice for repairing larger holes or cracks. This method involves using heat to melt the plastic, allowing you to fuse it back together. You can use a specialized plastic welder or a simple soldering iron for this task. Begin by cleaning the area around the hole to ensure there’s no dirt or moisture. Heat the plastic gently until it becomes pliable, then press the edges of the hole together. You might find it helpful to practice on a scrap piece of plastic first, especially if you’re new to welding. Plastic welding creates a strong, durable bond that can restore your kayak’s integrity. However, it requires patience and precision, making it essential to work slowly to avoid burning or warping the plastic. Have you ever tried welding before, or are you ready to give it a shot?Epoxy Application
Epoxy application is another effective method for fixing smaller holes or cracks. Epoxy resin is a versatile adhesive that can create a watertight seal. It’s a great option if you prefer a less technical approach compared to plastic welding. Start by cleaning and drying the damaged area thoroughly. Mix the epoxy according to the package instructions and apply it evenly over the hole. Use a spatula or a similar tool to smooth it out, ensuring complete coverage. Allow the epoxy to cure fully before taking your kayak back in the water. This method is less intimidating for beginners, but the key is to ensure a thorough mix and application. Have you considered using epoxy for other DIY projects before? It might just become your new favorite tool in your repair kit.Plastic Welding Steps
Repairing a hole in a plastic kayak involves cleaning the area and using a heat source to melt the plastic. Press the softened plastic into the hole, ensuring it fills completely. Allow it to cool, forming a strong seal that restores the kayak’s integrity.
Repairing a hole in your plastic kayak requires precise steps. Plastic welding is an effective method. It involves heating and fusing the plastic. This process restores the kayak’s integrity. Follow these steps to ensure a successful repair.Heat The Plastic
Begin by cleaning the area around the hole. Remove dirt and debris. Use a dry cloth for this task. Next, gather your welding tools. You’ll need a heat gun and a plastic welding rod. Set your heat gun to a low temperature. Gradually increase the heat as needed. Hold the heat gun a few inches from the kayak surface. Move it in a circular motion. This helps distribute heat evenly. Watch as the plastic starts to soften. Avoid overheating to prevent damage.Melt And Fuse
Once the plastic is soft, introduce the welding rod. Slowly melt the rod into the hole. Use the heat gun to assist in this process. The rod and kayak plastic should merge together. Maintain steady pressure on the welding rod. This ensures a strong bond. Keep the heat consistent for a uniform weld. Allow the welded area to cool. It should harden and form a solid patch. Check for any gaps or weaknesses. If needed, reheat and apply more material. Ensure the repair is smooth and secure.Epoxy Repair Steps
Epoxy can efficiently fix holes in a plastic kayak. First, clean the damaged area thoroughly to remove dirt. Next, sand the surface around the hole to help the epoxy adhere better. Mix the epoxy resin and apply it to the hole, ensuring full coverage.
Let it cure completely before testing the kayak in water.
Repairing a hole in your plastic kayak with epoxy can be a straightforward process if approached with care. It’s a task that can save you from costly replacements and extend the life of your cherished kayak. If you’re ready to dive into the repair, following these epoxy steps will get you back on the water swiftly.Mix The Epoxy
Start by getting your epoxy kit. It’s vital to follow the manufacturer’s instructions on mixing the resin and hardener. Use a clean container to ensure no contaminants affect the mixture. Mix the epoxy thoroughly until it’s consistent in color and texture. This step is crucial for the epoxy to bond effectively to the kayak surface. Have you ever noticed how baking requires precision? Mixing epoxy is quite similar. A small mistake can lead to an ineffective repair.Apply And Smooth
Using a spatula or a flat tool, apply the mixed epoxy over the hole. Ensure you cover the entire area and slightly beyond the edges to secure a strong bond. Smooth out the epoxy, making sure there are no air bubbles. This helps in achieving a durable and seamless finish. Think about painting a wall. You wouldn’t leave streaks, right? Similarly, smoothing epoxy ensures the repair is both robust and visually appealing. Allow the epoxy to cure as per the instructions. Test the repair by gently pressing the area to ensure it’s solid before heading out for your next adventure. Have you considered the satisfaction of fixing your kayak yourself? It’s empowering, knowing that your skills can keep your kayak afloat.Finishing Touches
After patching the hole in your plastic kayak, the final steps ensure durability. These finishing touches are crucial for a seamless and leak-proof repair. Properly curing the patch and testing for leaks will safeguard your kayak’s performance.
Let It Cure
Allow the patch to cure completely. Follow the manufacturer’s instructions for the curing time. This is usually several hours. A proper cure is essential for a strong bond. Do not rush this step. Premature use can weaken the patch. If unsure, wait an extra day to ensure the bond is solid.
Test For Leaks
Once cured, test for leaks. Fill the kayak with water. Inspect the patched area closely. Look for any signs of moisture. Use a dry cloth to detect any wet spots. If leaks are found, repeat the patching process. Ensure the kayak is leak-free before use. This prevents future damage.

Credit: hub.jacksonkayak.com
Prevent Future Damage
Fixing a hole in a plastic kayak prevents future damage by using waterproof adhesive and a patch. Clean the area well before applying the patch to ensure strong bonding. Regular inspection and maintenance help in identifying and addressing small cracks early.
Preventing future damage to your plastic kayak not only extends its life but also ensures a safer and more enjoyable paddling experience. After investing time in fixing a hole, it’s worth taking proactive measures to avoid similar issues down the road. Here are some practical tips to help you keep your kayak in top shape.Proper Storage Tips
Storing your kayak correctly is crucial to preventing damage. Always keep it out of direct sunlight. UV rays can weaken the plastic, making it more susceptible to cracks and holes. Consider hanging your kayak from the ceiling using padded straps to evenly distribute weight. If space is an issue, store it on its side against a wall, ensuring it’s on a soft surface to avoid scratches. Avoid leaving your kayak on the ground for long periods. Moisture and critters can cause unseen damage over time.Regular Maintenance
Regular maintenance is key to spotting potential problems before they become serious. After each trip, rinse your kayak with fresh water to remove salt and debris. This simple step can prevent abrasion and corrosion. Inspect your kayak for any signs of wear or damage. Look for small cracks, dents, or discoloration. Catching these early can save you from bigger repairs later. Keep a repair kit handy. A quick patch or sealant can be the difference between a small fix and a major overhaul. Are there other ways you ensure your kayak stays in pristine condition? Share your tips and tricks for fellow paddlers to learn from!Frequently Asked Questions
Can You Patch A Hole In A Plastic Kayak?
Yes, you can patch a hole in a plastic kayak. Clean the area and sand it lightly. Use a plastic welding kit or repair adhesive for best results. Ensure the patch is secure and smooth. Allow it to dry completely before using the kayak again.
Will Flex Seal Work On A Kayak?
Flex Seal can repair minor leaks in a kayak. Ensure the surface is clean and dry for best results. It’s a temporary fix and not ideal for major repairs. For long-lasting solutions, consider professional repair methods. Test the seal in a safe environment before using the kayak.
Will Jb Weld Work On A Kayak?
Yes, JB Weld can repair a kayak. It bonds well with materials like plastic and fiberglass. Ensure surfaces are clean and dry for best results. Allow sufficient curing time for maximum strength. Always check compatibility with your kayak’s material before use.
How To Repair A Puncture In A Kayak?
Clean the punctured area thoroughly. Dry it completely. Apply a vinyl repair adhesive. Press a patch firmly over the puncture. Let it cure for 24 hours. Inflate the kayak to check for leaks.
Conclusion
Fixing a hole in your plastic kayak is simple. Follow the steps, and you’ll be back on water quickly. First, gather all necessary materials. Clean the area around the hole thoroughly. Use a plastic patch or welding method to seal it.
Ensure it’s watertight before testing. This prevents further damage. Regular checks and maintenance keep your kayak in good condition. Enjoy your kayaking adventures without worries. Your efforts today ensure many more days of fun. Stay safe, and happy paddling!


