
Imagine having your kayak stored safely and conveniently, ready for your next adventure. No more tripping over it in your garage or letting it take up valuable space.
Building your own kayak rack is easier than you think, and it can save you both time and hassle. If you love kayaking, you know how crucial it is to keep your equipment in top shape. A well-constructed rack ensures your kayak is secure and easily accessible whenever the water calls.
In this guide, you’ll discover simple steps to create a kayak rack that fits your space and your kayak perfectly. Whether you’re a DIY enthusiast or just looking for a practical solution, this project is not only rewarding but also incredibly useful. Ready to get started? Let’s dive into the details and make your kayak storage as seamless as your paddling.
Materials And Tools
Gather sturdy wood, metal brackets, screws, and a drill for building a kayak rack. These materials ensure stability and durability. Use a measuring tape and saw for accurate cuts and assembly.
When building a kayak rack, choosing the right materials and tools is crucial. They ensure your rack is sturdy and durable. Here’s a simple guide to help you gather what you need.Materials Needed
Start by collecting strong wood like cedar or pressure-treated pine. These types resist weather damage. Metal pipes or PVC can also be used for added strength. You’ll need screws or bolts to secure the structure. Consider using weather-resistant paint or sealant. This protects your rack from the elements.Tools Required
A saw is essential to cut your materials to the right size. Use a drill to make holes for your screws or bolts. A measuring tape ensures accurate dimensions. A level helps keep your rack straight and balanced. Sandpaper smooths any rough edges. This prevents damage to your kayak.Additional Supplies
To avoid scratches, use foam padding. It cushions your kayak. Brackets or hooks can provide extra support. They keep your kayak secure. Don’t forget safety gear like gloves and goggles. Safety is always a priority in any project. By gathering these materials and tools, you’re ready to start building. Each item plays a key role in creating a reliable kayak rack.Choosing The Right Location
Choosing the right location for your kayak rack is crucial for both convenience and safety. The perfect spot ensures easy access while protecting your kayak from potential damage. Selecting a location involves considering factors such as space availability, environmental exposure, and accessibility. As you ponder your options, think about how these elements can make your kayaking experience smoother and more enjoyable.
Finding Adequate Space
Space is a significant consideration when setting up a kayak rack. You need enough room to maneuver your kayak without bumping into other objects or causing damage. Assess areas like your garage, backyard, or even a shed. Imagine yourself lifting the kayak; does the space allow easy movement? The last thing you want is to wrestle with a confined area every time you go kayaking.
Considering Environmental Exposure
Environmental factors can greatly affect your kayak’s longevity. Placing your rack in a sheltered area reduces exposure to harsh weather conditions. Think about using covered areas like under a patio or inside a garage. This simple decision can save you money by preventing wear and tear caused by sun, rain, or snow.
Ensuring Accessibility
Accessibility is key for a hassle-free kayaking experience. Choose a spot that allows you to load and unload your kayak with minimal effort. Locations near vehicle access points are ideal. Is your chosen area easy to reach, or does it involve navigating through obstacles? A strategically placed rack saves time and energy, letting you focus more on the adventure ahead.
Balancing Security And Convenience
Security should also be on your checklist when deciding on a location. A secured spot ensures your kayak is safe from theft or accidental damage. Consider areas that are not easily visible from the street but still offer easy access. How can you balance security with convenience in your chosen spot? Finding this balance keeps your kayak safe and ready for your next trip.
Reflecting on these points can lead to a well-considered decision. The right location not only makes storing your kayak easier but also enhances the overall kayaking experience. Where will you place your kayak rack to make every adventure seamless and enjoyable?
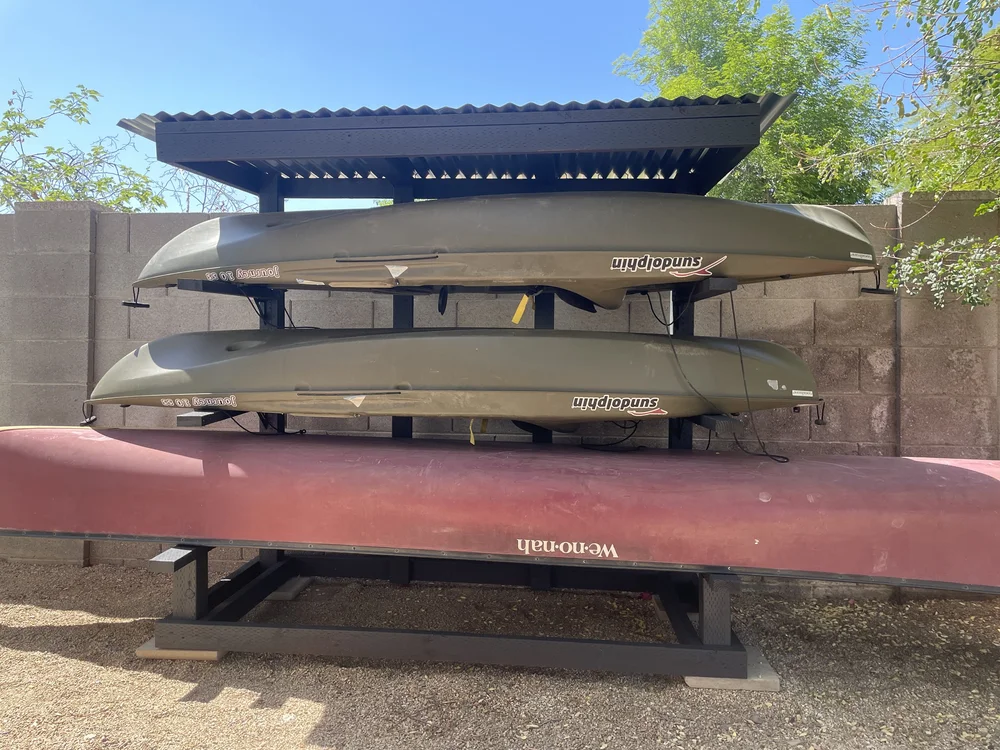
Designing Your Kayak Rack
Crafting a kayak rack involves choosing sturdy materials like wood or metal. Measure your kayak’s dimensions for a precise fit. Securely assemble the structure using reliable tools and techniques, ensuring stability and safety for your kayak storage solution.
Designing a kayak rack is an exciting endeavor that combines creativity with practicality. Whether you’re looking to store your kayak at home or transport it safely on your vehicle, a well-designed rack can make a significant difference. It allows you to maximize space, ensure safety, and keep your kayak in top condition.Types Of Kayak Racks
Choosing the right type of kayak rack is crucial. Wall-mounted racks are excellent for garage storage, keeping your kayak off the floor and out of harm’s way. Ceiling racks, on the other hand, are perfect for tight spaces, allowing you to use vertical space effectively. Freestanding racks offer flexibility and can be moved around as needed, making them ideal for outdoor storage. Vehicle racks are essential if you plan to transport your kayak to different locations. Consider your needs and available space when selecting the type of rack.Space Considerations
Space is a significant factor when designing your kayak rack. Measure the area where you plan to store your kayak, ensuring there’s enough room not just for the kayak but also for you to move around easily. If you’re using a wall-mounted or ceiling rack, ensure the walls or ceiling can support the weight of the kayak. Think about accessibility as well. Can you easily load and unload your kayak without straining yourself? Personal experience has taught me that having adequate space around the rack prevents scratches and damage, prolonging the life of your kayak. Are you maximizing your storage space while keeping convenience in mind?
Credit: www.familyhandyman.com
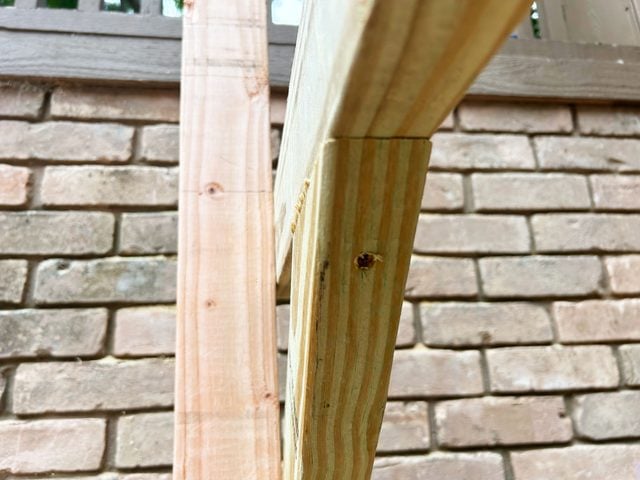
Building The Frame
Creating a sturdy frame is essential for a kayak rack. Use strong wood for stability and long-lasting durability. Measure the dimensions carefully to ensure the rack fits your kayaks perfectly.
Building the frame of a kayak rack is a crucial step. It provides the structure and stability needed to support your kayak. A well-built frame ensures your kayak stays secure and safe. This section will guide you through cutting wood and assembling the frame.Cutting Wood
Cutting the wood properly is essential for a sturdy frame. Measure the dimensions of your kayak to determine wood length. Use a saw to cut the wood to the desired size. Ensure cuts are straight and precise. This helps the pieces fit together neatly. Sand the edges to smooth any rough spots. This prevents splinters and provides a clean finish.Assembling The Frame
Begin by laying out the wood pieces on a flat surface. Use screws to attach the pieces together firmly. Drill pilot holes to avoid splitting the wood. Ensure all joints are tight and secure. Use a level to check that the frame is even. A stable frame prevents the kayak from tipping. Reinforce corners with metal brackets for added strength. Double-check all connections to ensure stability.Adding Support Structures
Adding support structures to your kayak rack is essential for ensuring stability and durability. Without proper support, your rack might collapse under the weight of your kayaks, leading to costly damages. Let’s dive into how you can effectively add support structures that make your kayak rack reliable and robust.
Installing Braces
Braces are the backbone of any sturdy kayak rack. They help distribute the weight evenly across the rack, preventing sagging or bending. You can use metal brackets or wooden beams as braces. Metal brackets provide strong support and are easy to install with screws. Wooden beams are a great option for a more rustic look and can be cut to fit precisely. Ensure the braces are tightly fixed; loose braces can lead to wobbling and instability.
Consider the location of your rack. If it’s exposed to strong winds, you might want to use diagonal braces for added security. They offer extra resistance against lateral forces, keeping your kayaks safe even in stormy weather.
Securing Joints
Joints are where different parts of your rack meet, and they need extra attention. Securing them is crucial to prevent the rack from collapsing under pressure. Use heavy-duty screws or bolts to fasten the joints securely. You can also apply wood glue for wooden racks to ensure a tight grip.
Think about reinforcing the joints with metal plates or angle brackets. These add an extra layer of durability, especially if you’re storing multiple kayaks. Double-check each joint after installation—are they tight and secure? A simple shake test can reveal potential weaknesses.
Remember, a well-secured joint is the key to a stable kayak rack. Wouldn’t you want peace of mind knowing your kayaks are safely stored?
Credit: makerpipe.com
Finishing Touches
Adding final touches to your kayak rack enhances both functionality and appearance. Ensure all parts are securely fastened. Smooth out any rough edges for a sleek, professional finish.
Once you’ve constructed the basic structure of your kayak rack, it’s time to add the finishing touches that will make it both durable and visually appealing. These final steps are crucial in ensuring your kayak rack stands the test of time and weather conditions. Whether you’re a seasoned DIY enthusiast or just starting out, these finishing touches can elevate your project from good to great.Sanding And Painting
A smooth surface is key to a professional-looking kayak rack. Sanding helps to remove rough edges and splinters, making your rack safer and more pleasant to handle. Use sandpaper with a fine grit, and don’t rush this step—smooth transitions matter. Once sanded, it’s time for painting. Choose a paint that complements your outdoor space. A bold, vibrant color can make your rack a standout feature, while neutral tones blend seamlessly. Remember to apply a primer first for better adhesion and longevity of the paint.Weatherproofing
Weatherproofing is essential for outdoor projects. Your kayak rack will face sun, rain, and possibly snow, so it’s important to protect it from these elements. Consider using a high-quality sealant or varnish designed for outdoor use. This adds an extra layer of protection, ensuring your rack remains sturdy and beautiful for years. Reflect on the climate in your area. Does your region experience heavy rainfall or intense sun? Adjust your weatherproofing methods accordingly. How do you envision your kayak rack in five years? A little effort now can make all the difference in preserving your hard work.Safety Tips
Creating a kayak rack is a rewarding project. Yet, safety remains crucial. A well-built rack protects your kayak and the surrounding area. Here are some essential safety tips to consider.
Proper Weight Distribution
Ensure your rack handles the kayak’s weight evenly. Uneven weight can cause instability and potential collapse. Distribute the kayak’s weight across multiple support points. This keeps the rack balanced and safe.
Test the weight distribution by gently pressing down on different parts. This helps identify weak points. Adjust accordingly to maintain stability.
Anchoring The Rack
Securely anchoring the rack is vital for safety. Use strong materials like metal brackets or heavy-duty screws. These offer better support than nails.
Attach the rack to a solid structure like a wall or beam. This prevents tipping or movement during use. Double-check all connections for tightness. Loose connections can lead to accidents.
Credit: www.familyhandyman.com
Maintenance And Care
Building a kayak rack requires careful planning and sturdy materials. Regular inspections ensure the rack remains stable and safe. Protect the rack from weather damage with sealants or paint.
Maintaining and caring for your kayak rack is crucial. It ensures longevity and safety for your kayaks. Regular checks and timely repairs keep it in top condition. This will prevent any potential damage to your kayaks. Proper maintenance will also save you money in the long run. Let’s explore the steps needed to keep your kayak rack in great shape.Regular Inspections
Inspect your kayak rack every month. Look for signs of wear and tear. Check all bolts and screws for tightness. Ensure there is no rust on metal parts. Examine wooden parts for cracks or splinters. Make sure the rack is stable and secure.Repairing Damage
Repair any damage as soon as you spot it. Tighten loose bolts and screws immediately. Sand down splinters on wooden parts. Use rust remover for metal components. Replace any broken parts quickly. This prevents further damage and ensures safety.Frequently Asked Questions
How Wide Should A Kayak Rack Be?
A kayak rack should be wide enough to securely hold the kayak and fit the vehicle. Measure your kayak’s width and the vehicle roof for accuracy. Typically, racks range from 24 to 36 inches wide. Ensure it supports your kayak’s weight and length for safe transportation.
How To Transport A Kayak With No Rack?
Use foam blocks or pool noodles as cushioning on the roof. Secure the kayak with strong straps through the car doors. Ensure the kayak is centered and balanced. Drive cautiously to avoid any shifts. Check local regulations for transporting kayaks without a rack.
Is It Better To Store A Kayak Vertically Or Horizontally?
Store a kayak horizontally with proper support to prevent warping. Ensure even weight distribution along its length. Vertical storage can risk damaging the hull, especially if not adequately supported. Always use padded racks or straps for protection.
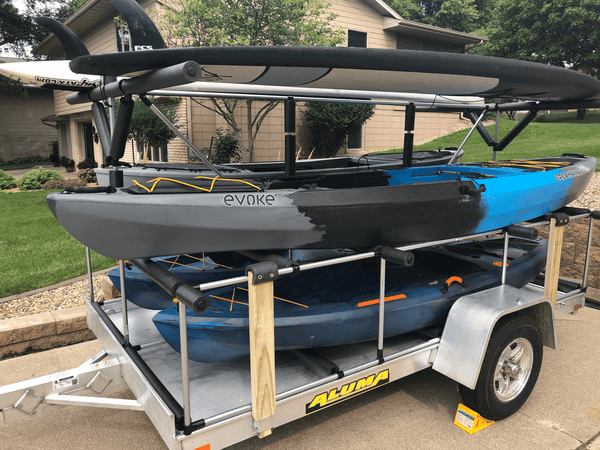
What Are The Best Roof Racks For Kayaks?
Yakima JayLow and Thule Hull-a-Port XT are top choices for kayak roof racks. Both offer secure, adjustable designs and easy installation. They support various kayak sizes and ensure safe transport. Always consider vehicle compatibility and load capacity when selecting a rack.
Conclusion
Building your own kayak rack is simple and rewarding. It saves space and keeps your gear organized. Follow the steps carefully. Double-check measurements to ensure stability. Use quality materials for durability. Customize to fit your needs. With patience, create a rack that lasts.
Share your creation with friends. Inspire them to try DIY projects too. Enjoy the satisfaction of using your handmade rack. Happy paddling and safe storage!


