
Imagine gliding effortlessly across the serene waters, your kayak moving smoothly as you fish or explore new territories. Sounds peaceful, right?
Mounting a trolling motor to your kayak can transform this vision into a reality. It’s not just about convenience; it’s about enhancing your adventure on the water. Have you ever felt the strain of paddling against a strong current or wished you could cover more distance without tiring yourself out?
By the end of this guide, you’ll know exactly how to mount a trolling motor to your kayak, opening up a new world of possibilities. Let’s make your kayaking experience more enjoyable and effortless. Your perfect day on the water is closer than you think.

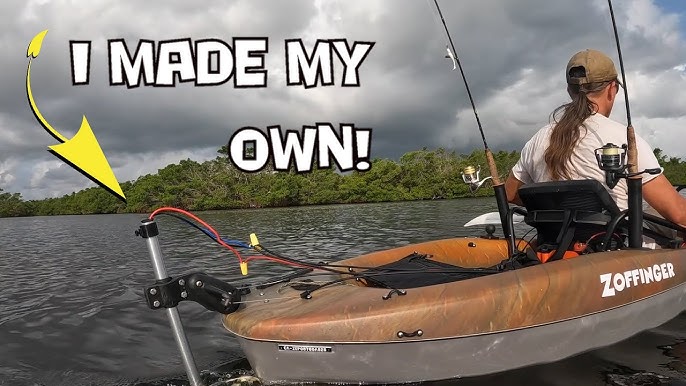
Credit: www.facebook.com
Choosing The Right Trolling Motor
Mounting a trolling motor on a kayak involves selecting the right bracket and ensuring secure attachment. Position the motor for easy access, considering weight distribution for stability. Adjust the motor height to avoid drag and test the setup in shallow water for efficiency.
Choosing the right trolling motor for your kayak is crucial. It affects your kayak’s speed, control, and efficiency on the water. The right motor enhances your kayaking experience. Let’s explore essential factors to consider.Types Of Trolling Motors
There are two main types of trolling motors: transom and bow mount. Transom mounts attach to the kayak’s stern. They are easy to install and ideal for smaller kayaks. Bow mounts fit the front. They offer better control but require more space. Choose based on your kayak’s design and your fishing style.Power And Thrust Considerations
Power and thrust determine how well the motor propels the kayak. Thrust is measured in pounds. More thrust is needed for larger kayaks or rough waters. Ensure your motor’s thrust matches your kayak’s weight and intended use. Check the motor’s voltage. Most are 12V, but some require 24V or more for higher thrust.Battery Options
Trolling motors need a reliable power source. The battery type affects performance. Lead-acid batteries are common and affordable. Lithium-ion batteries are lighter and last longer but cost more. Consider the battery’s weight and capacity. A higher capacity means longer trips without recharging. Ensure the battery is compatible with your motor’s voltage requirements.Preparing Your Kayak
Mounting a trolling motor to your kayak can unlock new adventures, making it easier to navigate through water with minimal effort. But before you can enjoy the seamless glide, preparation is key. Ensuring your kayak is ready for this addition is crucial to avoid mishaps and enjoy a smooth experience on the water. Let’s dive into the essentials of preparing your kayak for a trolling motor.
Assessing Kayak Compatibility
Not all kayaks are created equal when it comes to adding a trolling motor. First, check if your kayak has a flat and sturdy surface on the stern or side, ideal for mounting. If you’re unsure, consult your kayak’s manufacturer specifications or online forums for recommendations.
Consider the weight of the motor compared to your kayak’s weight capacity. Overloading can lead to instability. If you’ve ever struggled with balancing too much gear on your kayak, you know how crucial this step is. The right balance will keep you safe and your kayak agile.
Tools And Materials Needed
Having the right tools and materials will make the mounting process smooth and stress-free. Start with a checklist to ensure you have everything you need before you begin.
- Drill and bits:Essential for creating holes for mounting brackets.
- Mounting brackets:Choose brackets that fit your kayak’s design and your motor’s specifications.
- Stainless steel screws and bolts:These resist rust and are ideal for marine use.
- Wrench set:Necessary for tightening bolts securely.
- Sealant:Ensure watertight seals around drilled areas to prevent leaks.
Gathering these tools and materials is not just a matter of convenience; it’s a strategy to save time and avoid frustration. Imagine being halfway through the installation process only to realize you’re missing a critical component. Preparation here can make all the difference in your experience.
Are you ready to transform your kayak experience with a trolling motor? Dive into preparation, and ensure you’re equipped to make your kayaking adventures even more thrilling.
Mounting Techniques
Secure your trolling motor on a kayak using proper mounting techniques. Choose a sturdy spot on the kayak for stability. Ensure all parts are fastened tightly to prevent movement in water.
Mounting a trolling motor on your kayak can transform your paddling experience, offering you more control and efficiency on the water. Whether you’re navigating through calm lakes or battling currents, choosing the right mounting technique is crucial. Let’s dive into some effective methods that can help you make the most of your kayak adventures.Transom Mount Method
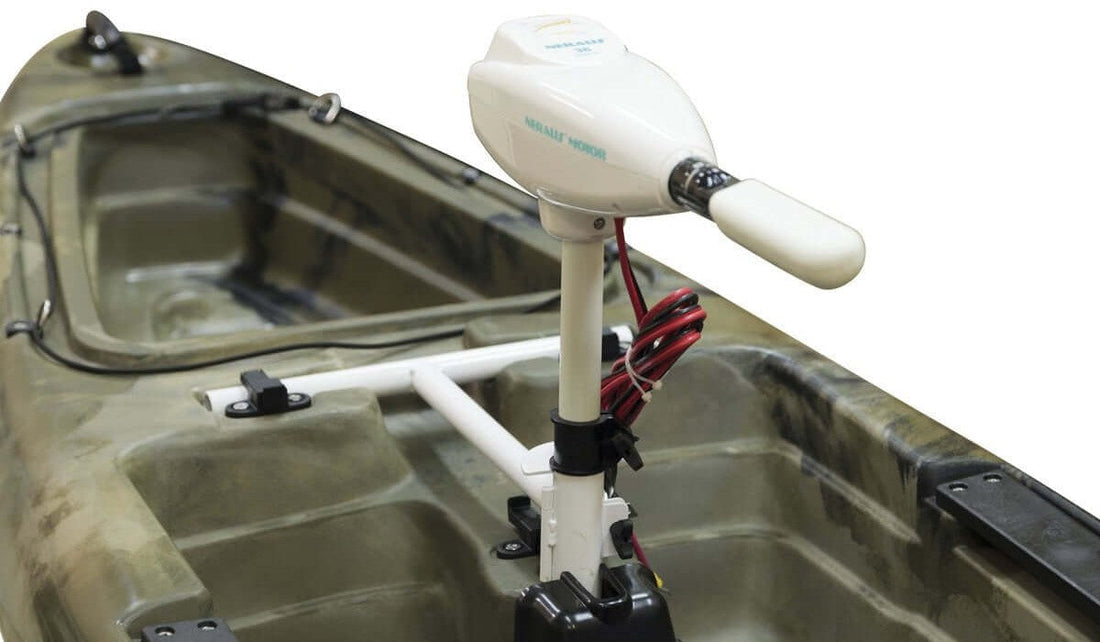
The transom mount method is a popular choice for many anglers due to its simplicity and effectiveness. You attach the trolling motor to the back of the kayak, providing straightforward steering and propulsion. This method is ideal for kayaks with a flat stern, allowing you to easily install a mounting bracket. Using a transom mount, you can maintain a clear line of sight and have unobstructed access to your gear. It’s a great option if you prefer traditional steering. However, consider the weight distribution to ensure stability while on the water. A friend once shared how balancing his gear made all the difference in his fishing trips, enhancing both stability and comfort.Bow Mount Method
The bow mount method offers superior control, often favored by seasoned kayakers looking for precision. Mounting the motor at the front allows for better maneuverability, especially in tight spots or strong currents. This technique is perfect for kayaks with a reinforced bow section, ensuring sturdy attachment. With a bow mount, you can easily adjust your direction without altering your paddling rhythm. It’s like having an extra set of hands on deck. However, keep in mind the added weight on the front, which can affect your kayak’s balance. Think about how your kayak handles in different water conditions to optimize this setup.Side Mount Method
The side mount method is a versatile option for those seeking flexibility. Attaching the motor to the side of your kayak allows for easy access and adjustment, making it a convenient choice for varied water activities. This method works well for kayaks with a wide body, providing enough space for secure installation. Side mounting offers the advantage of quick motor removal, perfect for kayakers who switch between paddling and motoring frequently. A fellow kayaker once mentioned how this method allowed him to swiftly adapt to changing weather conditions, proving the importance of versatility on the water. Consider how often you might need to switch between manual and motorized control to decide if this is the right method for you. What mounting technique resonates with your kayaking style? The right choice can elevate your experience, making each trip more enjoyable and efficient. Remember, it’s all about finding what works best for your needs and the adventures that lie ahead.Installation Steps
Mounting a trolling motor on a kayak can enhance your fishing experience. It offers more control and speed. Let’s dive into the installation steps. Follow these guidelines for a secure and efficient setup.
Securing The Mount
Start by selecting a suitable location on your kayak. The stern or bow is ideal for balance. Use a mounting bracket compatible with your kayak’s design. Align the bracket with pre-drilled holes if available. If not, mark spots for drilling. Drill carefully to avoid cracks.
Attach the bracket using stainless steel bolts. Tighten securely to withstand water conditions. Make sure the bracket sits flush against the kayak. This ensures stability during use.
Attaching The Motor
Slide the trolling motor into the mounted bracket. Align it properly to avoid tilting. Secure the motor with locking pins or screws. Check that the motor is firmly attached. A loose motor can cause accidents.
Adjust the angle for optimal water contact. Ensure easy access to controls while seated. Test the motor’s movement to confirm its range and stability.
Wiring And Electrical Setup
Gather all necessary wiring tools and materials. Connect the motor’s power cables to the battery. Ensure the connections are tight and secure. Use waterproof connectors to prevent moisture damage.
Route the cables safely along the kayak’s interior. Avoid loose wires that may snag. Use cable ties to keep them neat and organized.
Check the battery’s charge level before heading out. Test the motor’s functions for proper operation. Make any adjustments needed to wiring or connections.
Safety Tips
Mounting a trolling motor on your kayak can transform your fishing experience. Before setting out, it’s vital to consider safety tips to ensure a smooth ride. This guide will help you keep your adventure safe and enjoyable.
Balancing The Kayak
Balance is crucial for stability. Ensure the motor’s weight is evenly distributed. Adjust gear placement to maintain balance. Position heavier items opposite to the motor. This helps prevent tipping over.
Check your kayak’s weight capacity. Overloading can affect stability. Secure items tightly to avoid shifting. Practice balancing your kayak in calm waters.
Handling And Maneuvering
Handling a kayak with a motor requires practice. Start in calm waters for control. Test turning and stopping. Familiarize yourself with the motor’s controls.
Use gentle movements to steer. Sudden turns can cause instability. Keep an eye on your surroundings for obstacles. Always have a paddle ready for manual control if needed.
Credit: brooklynkayakcompany.com
Maintenance And Care
Mounting a trolling motor to a kayak involves careful placement and secure attachment. Ensure the motor is balanced for smooth navigation. Regularly check for loose bolts and clean any accumulated debris for optimal performance.
Mounting a trolling motor on a kayak enhances your fishing experience. But maintaining it is crucial for longevity and performance. Proper care ensures your motor runs smoothly, reducing the risk of breakdowns. Let’s explore essential maintenance tips.Regular Inspection
Check the trolling motor for wear and tear. Inspect wiring for any damage. Loose connections can lead to performance issues. Examine the propeller for obstructions or damage. Ensure all bolts and screws are tight. Look for signs of corrosion on metal parts.Cleaning And Storage
Clean the motor after every use. Saltwater can cause corrosion. Rinse the motor with fresh water. Use a soft cloth to wipe it dry. Store the motor in a cool, dry place. Avoid direct sunlight exposure. Cover it with a protective cover. This prevents dust accumulation.
Credit: www.youtube.com
Frequently Asked Questions
Where Is The Best Place To Mount A Trolling Motor On A Kayak?
Mount the trolling motor on the stern or bow for optimal balance. Ensure secure attachment and easy accessibility. Choose a location based on your kayak’s design and available space. Proper mounting enhances stability and performance during navigation. Always follow manufacturer guidelines for installation.
Can You Mount A Trolling Motor To A Kayak?
Yes, you can mount a trolling motor to a kayak. Use a compatible motor mount for secure attachment. Ensure your kayak is stable enough to handle the motor’s weight and power. Check local regulations regarding motorized kayaks. Always prioritize safety and proper installation techniques for optimal performance.
Is It Worth Putting A Trolling Motor On A Kayak?
Adding a trolling motor to a kayak enhances speed and maneuverability. It saves energy during long trips. Anglers find it useful for stealthy approaches. Ensure the kayak can support the motor’s weight. A trolling motor increases enjoyment for fishing and exploring.
Consider your kayak’s compatibility before purchasing a motor.
Is It Legal To Put A Trolling Motor On A Kayak?
Yes, it is legal to mount a trolling motor on a kayak. Ensure compliance with local regulations. Check if registration or permits are required in your area. Always prioritize safety and follow manufacturer guidelines when installing and operating the motor.
Conclusion
Mounting a trolling motor to a kayak enhances your water adventures. It’s not hard, just follow each step closely. First, gather all necessary tools and materials. Next, choose a suitable mounting location. Attach the motor securely for safe operation. Test it out in calm water initially.
Adjust as needed for better stability and control. Enjoy longer trips with less effort on your kayak. Always prioritize safety while on the water. Proper installation ensures a smooth and enjoyable experience. Embrace the thrill of powered kayaking with confidence.
Happy paddling and exploring!


