
Imagine you’re gliding across a serene lake in your kayak, the sun warming your back and the gentle splash of water surrounding you. Suddenly, you notice your kayak isn’t quite floating as it should.
Panic sets in as you realize there’s a hole! Before you let worry take the helm, know this: patching a hole in your kayak is simpler than you might think, and you can do it yourself with just a little guidance.
You’ll discover straightforward steps to fix your kayak and get back on the water quickly. We’ll break down the process into easy-to-follow instructions, ensuring you feel confident tackling the task. Plus, we’ll share insider tips to prevent future mishaps, keeping your kayak adventures smooth and stress-free. Keep reading to become your kayak’s hero and ensure your next outing is as enjoyable as possible.

Credit: hub.jacksonkayak.com
Materials Needed
Gather a plastic repair kit, sandpaper, and a heat gun. Ensure you have gloves and a clean cloth handy. These tools will help mend the kayak hole efficiently.
When you need to patch a hole in your kayak, having the right materials is crucial. A well-prepared repair kit can make the process smooth and effective. Whether you’re on a river adventure or prepping for a sea voyage, knowing what tools and kits to have will save you time and stress.Essential Tools
Make sure to gather these essential tools before starting the repair:- Sandpaper or a sanding block for smoothing edges.
- Scissors or a utility knife for cutting patches.
- A clean cloth or rag to wipe the area.
- Heat gun or hair dryer for applying heat.
- A ruler or measuring tape for accuracy.
- Marker or pen for outlining the patch area.
Recommended Repair Kits
Several repair kits are available that simplify the patching process. Here are some recommended ones:- Vinyl and PVC patch kits for inflatable kayaks.
- Fiberglass repair kits for rigid kayaks.
- Epoxy resin kits for structural repairs.
- Polyethylene welding rods for plastic kayaks.

Credit: www.youtube.com
Preparing The Kayak
Preparing the Kayak Ensure the kayak is dry and clean before starting any repairs. Gather necessary tools like sandpaper, patch kit, and adhesive. Carefully locate the hole and mark it for easier identification.
Preparing the Kayak Before fixing a hole in your kayak, preparation is crucial. A well-prepared kayak ensures a smooth repair process. It helps the patch stick properly and lasts longer. Let’s get started with cleaning and drying the surface.Cleaning The Surface
Begin by rinsing the kayak with fresh water. This removes dirt and debris. Use a mild detergent for stubborn grime. Scrub gently with a soft sponge or cloth. Avoid harsh chemicals that can damage the kayak. Rinse thoroughly to remove soap residue. A clean surface is essential for a strong patch bond.Drying The Area
Once cleaned, ensure the area is dry. A wet surface can weaken the adhesive. Use a towel to blot excess water. Allow the kayak to air dry completely. Patience is key here. You can use a hairdryer for faster drying. Keep it at a safe distance to avoid heat damage. A dry surface ensures the patch adheres well.Identifying The Damage
Identifying damage in a kayak is the first step to fixing it. Carefully examine the kayak for cracks or holes. Pay attention to scratches that might hide larger problems. Use a flashlight to check the interior for leaks. Accurate identification ensures effective repairs.
Identifying the damage on your kayak is the first step to ensuring its longevity on the water. Recognizing the type and extent of the damage not only aids in effective repairs but also ensures your safety. A thorough examination can prevent further issues and give you peace of mind during your adventures.Types Of Holes
Kayak holes generally fall into two main categories: punctures and abrasions. Punctures are usually sharp, clean cuts through the kayak’s surface, often caused by rocks or sharp objects. Abrasions, on the other hand, are more like scrapes or worn areas that gradually thin the material, often due to dragging the kayak on rough surfaces. Identifying the type of hole is crucial, as it dictates the repair method you’ll use. Punctures might require patch kits or welds, while abrasions could need more extensive material replacement. Always inspect your kayak under good lighting to spot these differences.Assessing The Size
Once you’ve identified the type of hole, the next step is to assess its size. Small holes, less than an inch in diameter, can often be patched with simple DIY kits. Larger holes, however, might require professional repair or more advanced techniques. Use a ruler or measuring tape to gauge the dimensions of the damage. This will help you determine the materials and time needed for repair. Remember, even small holes can compromise your kayak’s integrity, so don’t underestimate them. Have you ever noticed a minor hole and ignored it, only for it to worsen later? Taking immediate action can save you from costly repairs and unexpected mishaps on your next paddle. Always prioritize checking the kayak thoroughly after each use.Patch Application Techniques
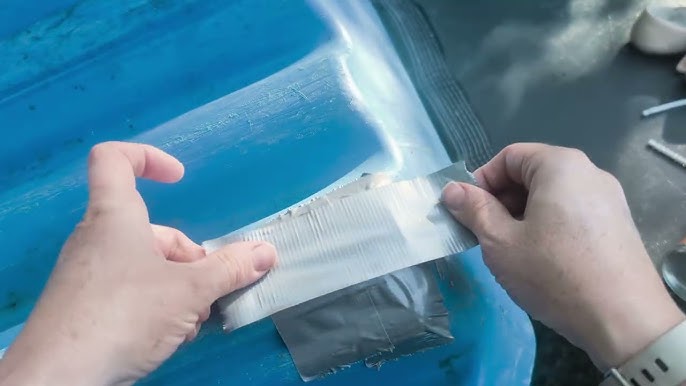
Clean the area around the hole in your kayak. Apply adhesive to the patch and press it firmly onto the kayak, ensuring it covers the hole completely. Let it dry according to the instructions for a secure seal.
Patch Application Techniques Repairing a hole in your kayak might seem daunting, but with the right techniques, you can restore it to its former glory. Whether you’re dealing with a small puncture or a significant tear, the method you choose to apply the patch can make all the difference in its longevity and effectiveness. Let’s dive into some of the most effective patch application techniques that can get your kayak back on the water.Using Epoxy Resin
Epoxy resin is a popular choice for its strong adhesive properties and water resistance. To use epoxy resin, ensure the surface around the hole is clean and dry. Mix the resin according to the instructions and apply it generously over the damaged area. It’s crucial to smooth it out evenly to avoid lumps and ensure a seamless finish. One tip is to use a spatula or a piece of cardboard to spread the resin evenly. Have you ever wondered why some patches fail? It’s often due to uneven application. So, take your time with this step for a durable fix.Applying Fiberglass Cloth
Fiberglass cloth adds strength and structure to the patch. Start by cutting a piece of fiberglass cloth to cover the damaged area with an extra margin. Apply the resin over the hole and lay the fiberglass cloth on top. Gently press it into the resin and apply another layer of resin over the cloth. To achieve the best results, work quickly before the resin starts to set. Why settle for a temporary fix when you can reinforce your patch with fiberglass? This technique ensures your kayak can withstand rough waters once again.Heat Welding Methods
Heat welding is ideal for plastic kayaks, offering a permanent and reliable repair. For this, you’ll need a heat gun and compatible plastic welding rods. Clean the area and slowly heat the edges of the hole until they become pliable. Add the plastic rod and melt it into the hole, blending it with the kayak’s material. Remember to maintain a steady hand and controlled heat to avoid damaging the surrounding area. Have you ever considered the long-term benefits of heat welding? It’s a method that doesn’t just patch the hole but restores the integrity of the kayak’s material.Finishing Touches
After successfully patching a hole in your kayak, it’s essential to focus on the finishing touches. These final steps ensure that your kayak is not only watertight but also maintains its smooth appearance. Let’s dive into these crucial tasks that will make your kayak ready for the next adventure.
Smoothing Edges
Once the patch is in place, you’ll want to ensure that the edges are smooth and flush with the kayak’s surface. Rough edges can cause drag and affect your paddling efficiency. Use sandpaper or a file to gently smooth out any uneven edges. Pay attention to blending the patch seamlessly into the kayak’s surface.
Have you ever noticed how a seamless repair makes your kayak look brand new? This attention to detail not only improves performance but also boosts your confidence on the water.
Testing For Leaks
Before you hit the water, it’s crucial to test for leaks. Fill your kayak with a small amount of water or use a hose to simulate water exposure. Carefully inspect the patched area for any signs of leakage. A leak-free kayak ensures safety and peace of mind during your paddling adventures.
Don’t just rely on visual inspection; sometimes, small leaks are hard to spot. Consider using a sponge to dab around the patch—any moisture on the sponge indicates a leak.
Have you ever thought about the importance of a leak-free kayak? It can be the difference between a smooth ride and an unexpected swim. Ensuring your kayak is watertight is an essential skill every paddler should master.
Preventative Measures
Regularly inspect your kayak for small cracks or holes. Use a waterproof patch kit to fix any damage promptly. Keep the kayak clean and dry to prevent further wear.
Preventative measures ensure your kayak stays in top condition. By taking care of your kayak, you can avoid costly repairs. Regular attention keeps small issues from becoming major problems. Follow these simple guidelines to keep your kayak ready for adventure.Regular Maintenance Tips
Regular maintenance keeps your kayak performing well. Inspect your kayak for any signs of wear. Look for cracks, scratches, or any deformities. Clean your kayak after each use to remove dirt and salt. Use a mild soap and water solution for cleaning. Rinse thoroughly to prevent soap residue buildup. Apply a UV protector to shield the kayak from sun damage. Check the fittings and handles for tightness. A loose fitting can cause unexpected issues.Storage Recommendations
Proper storage extends the life of your kayak. Store your kayak indoors or under a cover. Avoid direct sunlight to prevent fading and weakening. Keep your kayak off the ground using racks or stands. This prevents moisture and insect damage. Ensure the storage area is dry and ventilated. Hang the kayak using straps for added safety. Avoid using ropes, as they can deform the kayak. Periodically check the storage area for pests or leaks.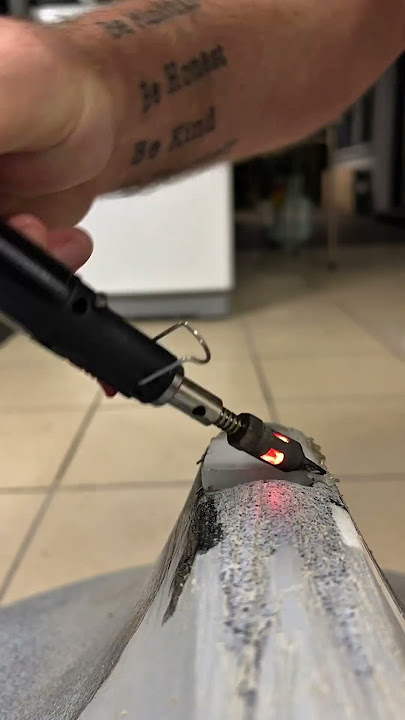
Credit: www.youtube.com
Frequently Asked Questions
Can You Repair A Hole In A Kayak?
Yes, you can repair a hole in a kayak. Use a kayak repair kit for small holes. Clean the area thoroughly. Apply the patch or epoxy as instructed. Allow time for proper curing before using the kayak. Consider professional repair for larger damages to ensure safety and durability.
Can A Plastic Kayak Be Patched?
Yes, a plastic kayak can be patched. Use a plastic repair kit for best results. Clean the damaged area thoroughly before applying the patch. Heat welding is effective for larger cracks. Always ensure the patch material matches your kayak’s plastic type for a durable repair.
Will Jb Weld Work On A Kayak?
Yes, JB Weld can repair small cracks in kayaks. It’s waterproof and bonds well to various materials. Ensure surfaces are clean and dry before application. For large damages, consider professional kayak repair services. Always check product specifications for compatibility with kayak material.
Can You Plug The Holes In A Kayak?
Yes, you can plug holes in a kayak using marine sealant or waterproof repair tape. Ensure the surface is clean and dry before applying. For larger holes, consider using a patch kit or fiberglass resin. Regularly inspect for leaks to maintain kayak safety and performance.
Conclusion
Fixing a hole in your kayak is easier than you think. With the right tools, you can quickly repair it yourself. Inspect the damage first to choose the best patching method. Use quality materials to ensure long-lasting results. Always follow the instructions carefully.
Test your kayak in calm waters after the repair. This ensures safety and durability. Regular maintenance can prevent future damage. Enjoy your kayaking adventures with confidence. Safe and sound on the water. Happy paddling!


