
Got a crack or hole in your plastic kayak and not sure what to do? Don’t worry; you’re not alone.
Many kayak enthusiasts face this issue, but the good news is that you can fix it yourself. Imagine getting back on the water quickly without spending a fortune on repairs or replacements. This guide will walk you through simple, effective steps to repair your plastic kayak, saving you time and money.
Whether you’re a seasoned paddler or a weekend adventurer, understanding how to perform basic repairs can keep your kayak in top shape. Ready to dive in and learn how to give your kayak a new lease on life? Let’s get started!

Credit: www.youtube.com
Assessing Damage
Repairing a plastic kayak starts with assessing the damage. This crucial step ensures effective repair. Begin by examining every part of the kayak. Look for visible and hidden problems. Understanding the extent of damage helps in choosing the right repair method. Let’s dive into the key areas to check.
Identifying Cracks And Holes
Cracks and holes are common issues in plastic kayaks. Inspect the kayak’s hull and body closely. Use a flashlight to spot hidden cracks. Check around the edges and seams. Pay attention to areas exposed to impact. Feel for any unusual softness or flexibility. Mark all identified cracks and holes for repair.
Evaluating Wear And Tear
Wear and tear occur over time with regular use. Inspect the kayak’s surface for scratches and abrasions. Look at high-contact areas like the bottom and sides. Check for color fading, which indicates material weakening. Examine the kayak’s fittings and attachments. Ensure they are secure and not worn out. Regular evaluation helps maintain kayak durability.
Gathering Repair Materials
Gather essential materials like plastic welding rods and a heat gun for plastic kayak repair. Ensure you have sandpaper, a utility knife, and safety gear ready.
Gathering the right materials is crucial before you begin repairing your plastic kayak. This preparation sets the stage for a successful fix, ensuring your kayak is ready for future adventures. Imagine the satisfaction of paddling with confidence knowing you’ve addressed every crack and scratch yourself. But what exactly do you need to get started?Essential Tools
The toolkit for repairing a plastic kayak is surprisingly simple yet effective. You’ll need a heat gun, which is crucial for reshaping and bonding the plastic. A small, sharp knife helps to trim any excess material and smoothen edges. Consider a pair of protective gloves to safeguard your hands during the process. Do you have sandpaper on hand? It’s vital for roughening surfaces to ensure a strong bond between materials. These tools are the backbone of your repair operation.Choosing The Right Adhesives
Selecting the right adhesive is like finding the perfect glue for your craft project—it makes all the difference. For plastic kayaks, marine-grade epoxy or plastic welding rods are your go-to choices. These adhesives are designed to withstand water exposure and harsh conditions. Be sure to check compatibility with your kayak’s material type. Did you know that some adhesives come with UV protection? This can extend the life of your repair by preventing sun damage. The right adhesive can be the difference between a temporary fix and a long-term solution. By gathering these tools and adhesives, you’re setting yourself up for success. What other materials do you think could be useful in your repair kit?Preparing The Surface
Clean the kayak thoroughly to remove dirt and grime. Use soap and water for a fresh surface. Let it dry completely before proceeding.
Repairing a plastic kayak can seem daunting, but it all begins with preparing the surface. This crucial step ensures that the repair materials adhere properly and result in a long-lasting fix. Think of it as laying the foundation for a solid repair job.Cleaning The Area
Start by thoroughly cleaning the damaged area. Use a mild soap and water solution to remove dirt, grime, and salt residues. A clean surface is essential because any contaminants can prevent bonding. After washing, dry the area completely using a clean cloth. Moisture can interfere with the adhesive process, so ensure no dampness remains. A hairdryer can be a useful tool here for quick drying.Sanding For Better Adhesion
Sanding is your next step for preparing the surface. Use sandpaper with a grit of 80 to 120 for roughening the area around the damage. This rough texture gives adhesives more to cling to, enhancing the bond. Ensure you sand about two inches beyond the damaged spot for a secure repair. You might notice the surface turning slightly dull; this is a good sign that you’ve sanded enough. Remember to wipe away any dust created by sanding with a damp cloth. This ensures a clean, dust-free surface for the adhesive to work effectively. Preparing the surface might seem like a small step, but it’s the secret to a successful kayak repair. Have you ever noticed how much smoother things go when you start with a solid foundation?Repairing Cracks And Holes
Repairing cracks and holes in a plastic kayak involves cleaning and drying the damaged area thoroughly. Apply a plastic repair kit or epoxy designed for kayaks, ensuring a smooth finish to restore the kayak’s integrity.
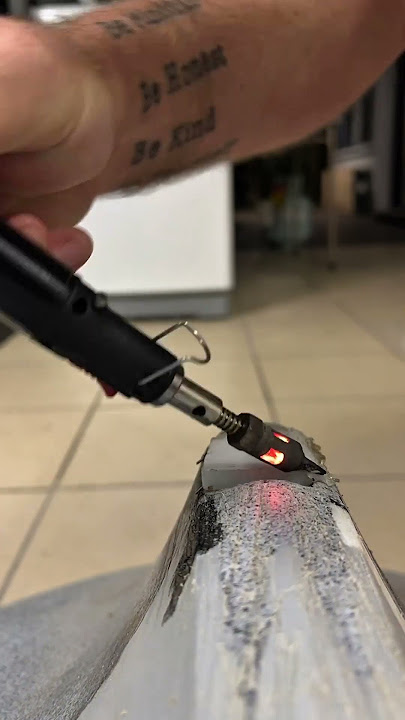
Repairing cracks and holes in a plastic kayak can extend its life. These damages are common but fixable with the right techniques. You’ll need to assess the size and location of the damage first. Once you have identified the problem areas, you can decide on the best repair method. Two popular methods include plastic welding and applying epoxy resin.Using Plastic Welding
Plastic welding is a reliable way to fix kayak cracks. It involves melting plastic rods to fill gaps. This method works well for larger cracks. Start by cleaning the damaged area thoroughly. Dirt can interfere with the welding process. Use a plastic welding tool to heat the edges of the crack. Slowly melt the plastic rod into the crack. Ensure the rod melts evenly across the gap. This creates a strong bond and smooth finish. Allow the welded area to cool completely before testing the repair.Applying Epoxy Resin
Epoxy resin is ideal for small holes and hairline cracks. It creates a watertight seal without requiring heat. Begin by cleaning the kayak surface. This ensures the resin adheres properly. Mix the epoxy resin according to package instructions. Apply the resin to the crack using a brush. Make sure to cover the entire damaged area. Allow the resin to cure for the recommended time. Check the repair by pressing lightly around the crack. If the surface feels firm, the repair is successful. Reapply if necessary for larger holes.Strengthening Weak Spots
Kayaking is a thrill, but it can also bring challenges. Over time, plastic kayaks may develop weak spots. Strengthening these areas ensures your kayak remains safe and durable. Learn how to reinforce weak spots effectively.
Reinforcing With Fiberglass
Fiberglass strengthens weak areas on your kayak. Begin by cleaning the spot thoroughly. Dust and dirt affect adhesion, so ensure it’s spotless. Cut fiberglass cloth to fit the damaged area. Mix epoxy resin and hardener, following instructions for the right ratio.
Apply resin to the weak spot using a brush. Place the fiberglass cloth over the resin. Smooth it out to remove air bubbles. Cover the cloth with more resin, ensuring it’s fully saturated. Allow it to cure completely before using the kayak.
Adding Additional Support
Additional support prevents further damage. Identify weak spots that need reinforcement. Foam blocks or plastic rods work well for extra support. Attach foam blocks with waterproof adhesive. They cushion impacts and protect your kayak.
Plastic rods enhance structural integrity. Secure them in place with resin or adhesive. Position them strategically to brace weak areas. Test the kayak to ensure stability after reinforcement. This extra support prolongs the kayak’s lifespan.
Sealing And Finishing
Apply a waterproof sealant to ensure the repair lasts longer. Smooth out any rough edges for a clean finish.
Repairing a plastic kayak doesn’t end with fixing the crack or hole; you must ensure that your kayak remains waterproof and smooth. Sealing and finishing are crucial steps to enhance the durability and appearance of your kayak. Let’s dive into how you can apply sealant effectively and polish for a sleek finish.Applying Sealant For Waterproofing
Ensuring your kayak is waterproof is essential for a safe and enjoyable paddling experience. Choose a sealant that bonds well with plastic surfaces. Silicone-based sealants are often recommended due to their flexibility and strong adhesion. Before applying the sealant, clean the area thoroughly. Remove any dirt, grease, or debris which might hinder adhesion. A clean surface ensures a tight seal. Apply the sealant generously over the repaired area. Use a spatula or your finger to spread it evenly, covering all gaps. It’s similar to icing a cake—smooth and consistent application is key. Allow the sealant to cure as per the manufacturer’s instructions. This might take a few hours to several days, depending on the product. Patience is your friend here; rushing this step might compromise waterproofing.Polishing For A Smooth Finish
Once your sealant has cured, it’s time to polish your kayak. Polishing not only enhances its appearance but also reduces drag in the water, improving performance. Start by sanding the repaired area lightly. Use fine-grit sandpaper to avoid scratches. The goal is to achieve a smooth surface that blends seamlessly with the rest of the kayak. After sanding, apply a plastic polish using a soft cloth. Work in circular motions to ensure even coverage. This step restores the kayak’s shine and protects the surface. Buff the area with a clean cloth to remove any excess polish and achieve a sleek finish. Your kayak should now look as good as new, ready for your next adventure. Isn’t it satisfying to see a kayak transform from a damaged state to one that looks pristine? By sealing and finishing your repairs effectively, you ensure your kayak remains a trusty companion on the water.Preventative Maintenance
Regularly inspect your plastic kayak for cracks and dents. Clean the surface and gently sand any damaged areas. Apply plastic welding or adhesive to repair and seal the kayak, ensuring it remains watertight and ready for your next adventure.
Preventative maintenance is essential for keeping your plastic kayak in top condition, ensuring it provides you with countless adventures on the water. By taking proactive steps, you can avoid costly repairs and prolong the life of your kayak. Let’s dive into some practical tips and advice to help you maintain your kayak effectively.Regular Inspection Tips
Frequent inspections are key to identifying potential issues before they become serious problems. Start by examining the hull for any cracks or dents that may have formed. Even small imperfections can lead to bigger issues if left unchecked. Check the seams and joints for signs of wear or separation. These areas are particularly vulnerable and can easily be compromised. Don’t forget to inspect the deck fittings and accessories to ensure everything is secure and functioning properly. Taking a few minutes after each outing to inspect your kayak can save you time and money in the long run. Have you ever noticed a minor crack on your kayak that turned into a bigger problem? Regular checks can prevent such surprises.Storage And Handling Advice
Proper storage and handling are crucial for preventing damage to your kayak. Store your kayak indoors or under a protective cover to shield it from harsh weather conditions. UV rays can weaken plastic, making your kayak more susceptible to cracks and fading. When transporting your kayak, use padded racks or carriers to reduce the risk of scratches and dents. Lift your kayak carefully, avoiding dragging it across rough surfaces. If you’ve ever struggled with storing your kayak, consider investing in a wall-mounted rack or hoist system for easy access and protection. By following these storage and handling guidelines, you can keep your kayak in great shape. How do you ensure your kayak stays damage-free when not in use?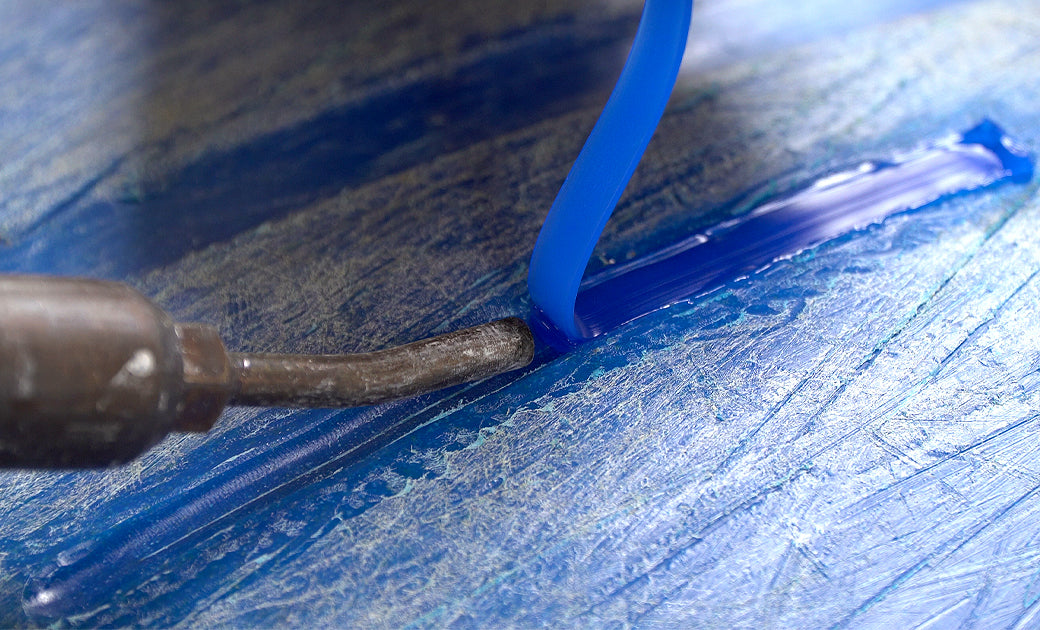
Credit: www.polyvance.com
Expert Tips And Tricks
Repairing a plastic kayak involves cleaning the damaged area thoroughly. Use a plastic welding kit for precise fixes. Seal the repair with a waterproof epoxy for durability.
When repairing a plastic kayak, expert tips make a big difference. They help ensure your kayak lasts longer and performs better. Whether patching a crack or sealing a joint, using the right techniques is key. Let’s explore some common mistakes to avoid and pro techniques for longevity.Common Mistakes To Avoid
Avoid using the wrong type of adhesive. Not all glues work on plastic kayaks. Make sure to choose one that is waterproof and suitable for plastic. Don’t rush the repair process. Allow enough time for the adhesive to cure fully. Rushing can weaken the bond, leading to future repairs. Improper surface preparation is another common error. Clean the area thoroughly before applying any adhesive. Dirt and grease can prevent a strong bond. Avoid ignoring safety precautions. Wear gloves and work in a well-ventilated area. Some adhesives can be harmful if inhaled or touched directly.Pro Techniques For Longevity
Sand the damaged area lightly before applying adhesive. This helps the glue adhere better. Use fine-grit sandpaper for the best results. Consider using a plastic welding kit for larger repairs. This tool can mend bigger cracks or holes effectively. It uses heat to fuse the plastic back together. Apply multiple thin layers of adhesive instead of one thick layer. This technique ensures a stronger and more flexible repair. Finally, inspect your repairs regularly. Catching small issues early can prevent bigger problems. Keep your kayak in top shape for many adventures.
Credit: www.youtube.com
Frequently Asked Questions
Can You Patch A Plastic Kayak?
Yes, you can patch a plastic kayak. Use a plastic welding kit or epoxy resin for effective repairs. Ensure the area is clean before applying the patch. Follow the manufacturer’s instructions for the best results. Properly patched kayaks can regain their strength and functionality.
Will Jb Weld Work On A Kayak?
Yes, JB Weld can repair a kayak. It works well on polyethylene, common in kayak construction. Ensure the surface is clean and dry before application for best results.
Will Flex Seal Work On A Kayak?
Flex Seal can work on a kayak for minor repairs. It seals small leaks and cracks effectively. Ensure the surface is clean and dry before application for optimal results. Flex Seal is not a permanent solution, so consider professional repairs for long-term kayak integrity.
How To Repair Polyethylene Plastic?
Clean the damaged area with soap and water. Roughen the surface using sandpaper. Use a polyethylene repair kit with a heat gun. Apply the polyethylene filler to the crack. Heat the area to melt the filler and bond the surfaces.
Allow it to cool and solidify.
Conclusion
Repairing a plastic kayak is simpler than it seems. Just follow the steps. Gather your tools and materials first. Clean the damaged area well. Use heat to soften the plastic. Patch it carefully, ensuring a good seal. Let it cool and set fully.
Test your kayak in calm water. Safety first! Regular checks prevent future damage. Happy paddling! Keep your kayak adventure-ready. Enjoy the waters with confidence. Share these tips with fellow kayakers. They’ll appreciate it. Keep exploring nature’s beauty. Kayak repairs shouldn’t hold you back.
Stay adventurous and safe!


